The Objective
PETG extrusion for 3D printer filament.
There is a growing number of hobbyists who are interested in plastic extrusion, whether it’s for creating their own 3D printer filament, utilizing pellet extrusion for large-format 3D printing, or for injection molding of small parts. However, screw extrusion is not an intuitive process, largely due to the complex rheological properties of plastics and their tendency to degrade when handled incorrectly. The goal of this guide is not to provide a comprehensive overview of polymer (i.e., plastic) processing but instead to hit the most important considerations when extruding plastic on a small scale (< 5 kg/hr) with commodity plastics. This is a companion guide to my two videos on Filament Extrusion and Plastic Recycling. All theory also pertains to pellet extruders found on large-format 3D printers, such as the one I built here.
Safety Warning: Screw extruders pose significant safety risks if not handled properly. They operate under high pressure, which can cause serious bodily harm or death if there is a sudden release of pressure or mishandling. Additionally, most surfaces of the extruder are extremely hot during operation, presenting burn hazards. Moreover, the extruder can emit toxic fumes, particularly when processing certain materials, so adequate ventilation and the use of appropriate personal protective equipment (PPE) are essential to mitigate inhalation risks.
Thermoplastics
Plastics can be broadly classified into two major categories: thermosets and thermoplastics. Liquid thermosets are chemically reactive resins that are mixed together or with a catalyst to form a solid component after curing. A two-part epoxy is the most well-known liquid thermoset. Once a thermoset has been cured, it cannot be returned to its precursors (liquid, powder, etc.) through thermal processing. In fact, instead of having a melting temperature, thermosets have a decomposition temperature because they burn once a certain temperature is reached.
Thermoplastics, on the other hand, can be melted, cooled, and re-melted multiple times without undergoing a significant chemical change. When melted, the molten plastic can be poured or injected into a mold, extruded through a die/nozzle, or thermoformed around a desired geometry. When cooled, the plastic regains its impressive strength-to-weight ratio. The ability to reform thermoplastics without loss of their desirable properties allows these materials to be recycled. If a plastic is sold as a pellet, then it is almost always a thermoplastic.
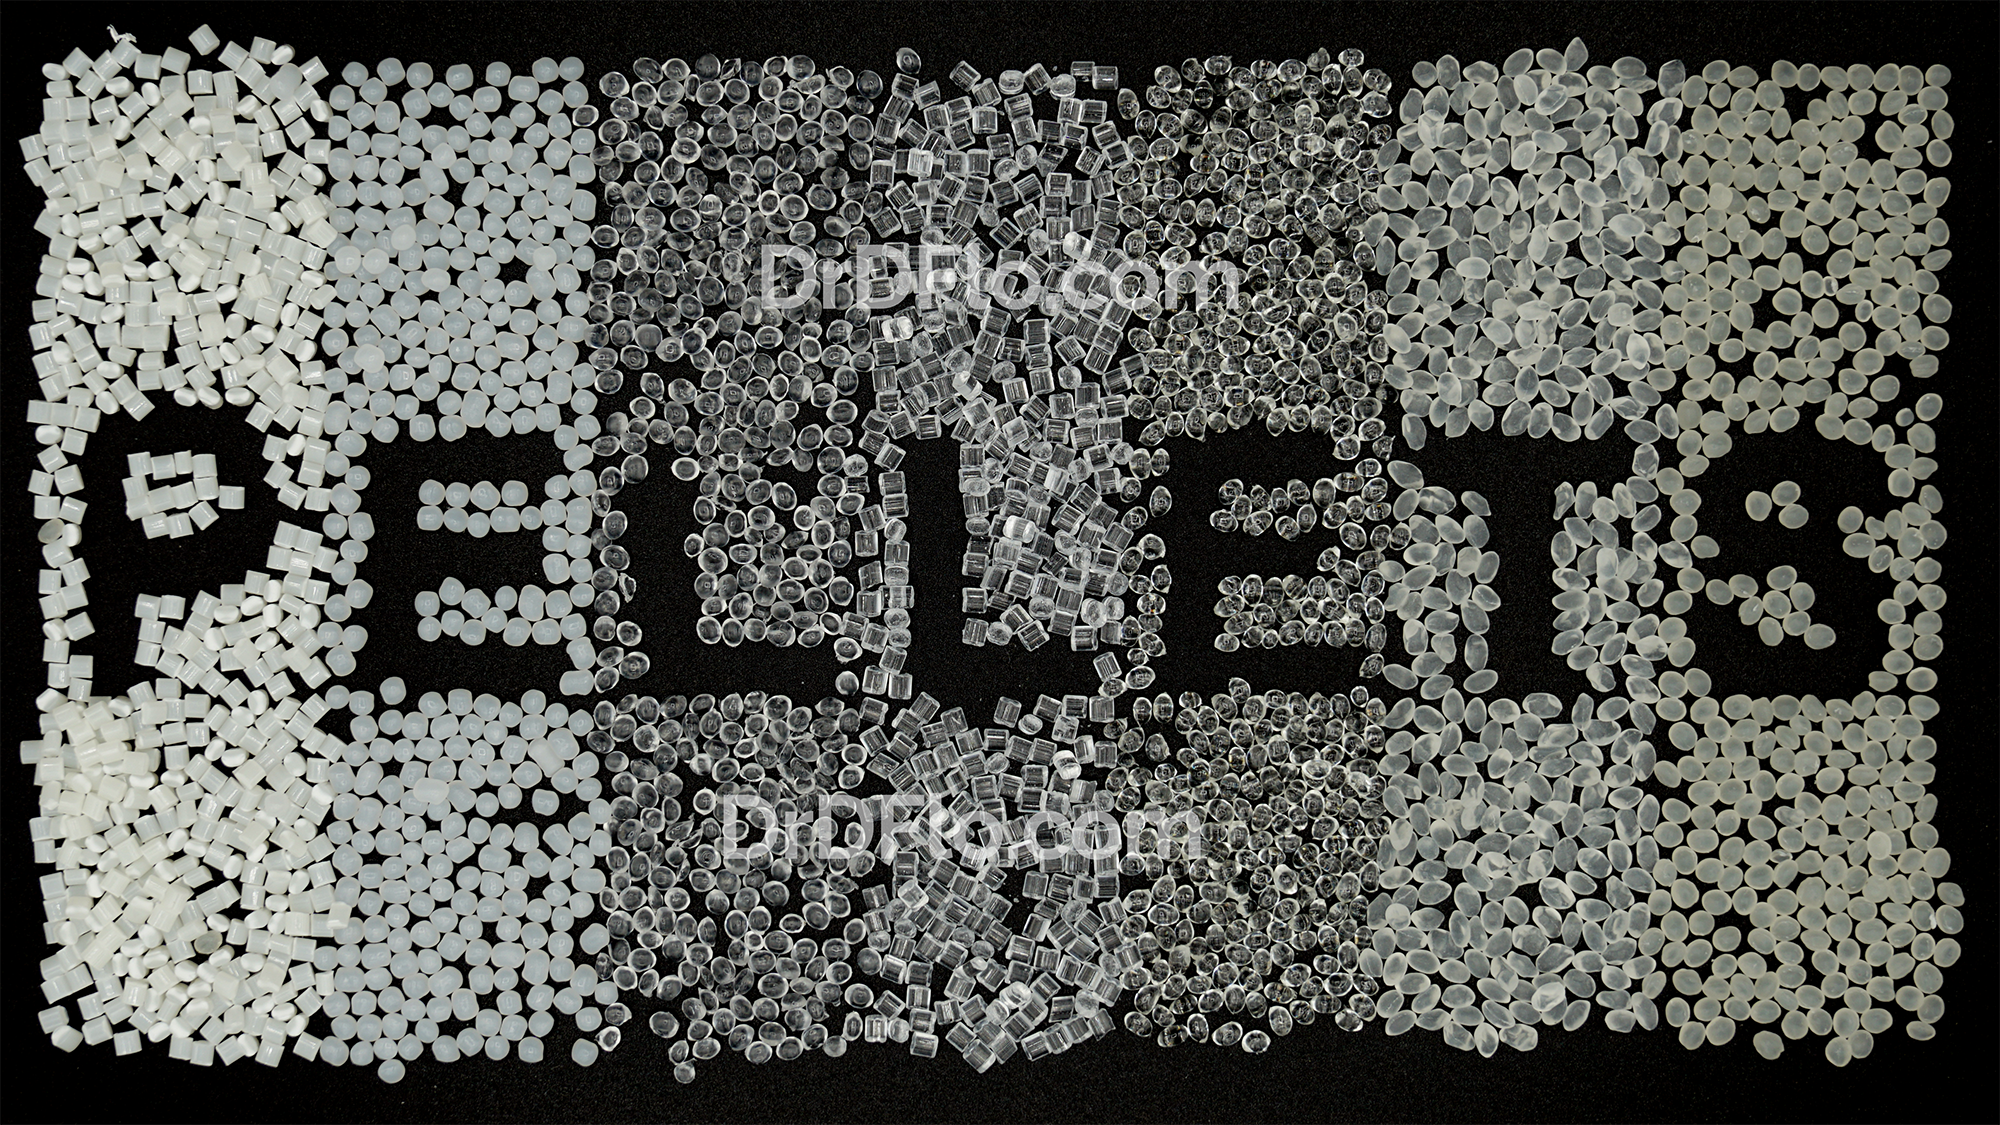
However, large volumes of plastics are difficult to melt due to their thermal conductivity that is, on average, 1000x less than metals. Further exacerbating the problem is the tendency of plastics to degrade when held above their melting point for long durations. Therefore, conductive heating (i.e., placing the plastic in an oven) is unsuitable for the thermal processing of polymers.
Screw Extrusion
The screw extruder was invented to overcome the challenges of efficiently heating significant quantities of plastics. This design relies on an Archimedean screw to melt, mix, and force plastic out of a die. Pelletized material is fed into a barrel and screw assembly, where the screw's rotation initiates the melting process through inter-pellet friction. When plastics melt, they become viscous fluids that resist the conveying motion of the screw. This resistance further heats the material, which is known as viscous or shear heating. The most important takeaway of this process is that the heating comes from within the plastic itself. As a result, the relatively low thermal conductivity of the plastic is less likely to impede the melting process.

Plasticizing Screw Design
There are many exotic screw designs, but this guide will focus on a simple screw with a single compression region. While I used the adjective “simple,” these screws are still far more specialized than a metal drill bit. Low cost extruders that use augers, drill bits, or other home improvement screws should be avoided. What makes an extruder screw unique are the following properties:
- High Length/Diameter Ratio (L/D Ratio). Extruder screws are characterized by their long length (L) in respect to their diameter (D). A high L/D ratio facilitates better mixing and improved thermal processing of the plastic. Longer extruders (higher L/D) have more melting and mixing capacity. Common L/D ratios for screw extrusion typically range from 20:1 to 30:1.
- Compression. Nearly all extruder screws feature a tapered design where the depth of the thread or flight decreases from one end to the other. This compression plays an important role in melting the plastic and generating the pressure required to force the plastic through the desired geometry or die. More details on screw compression is provided below.
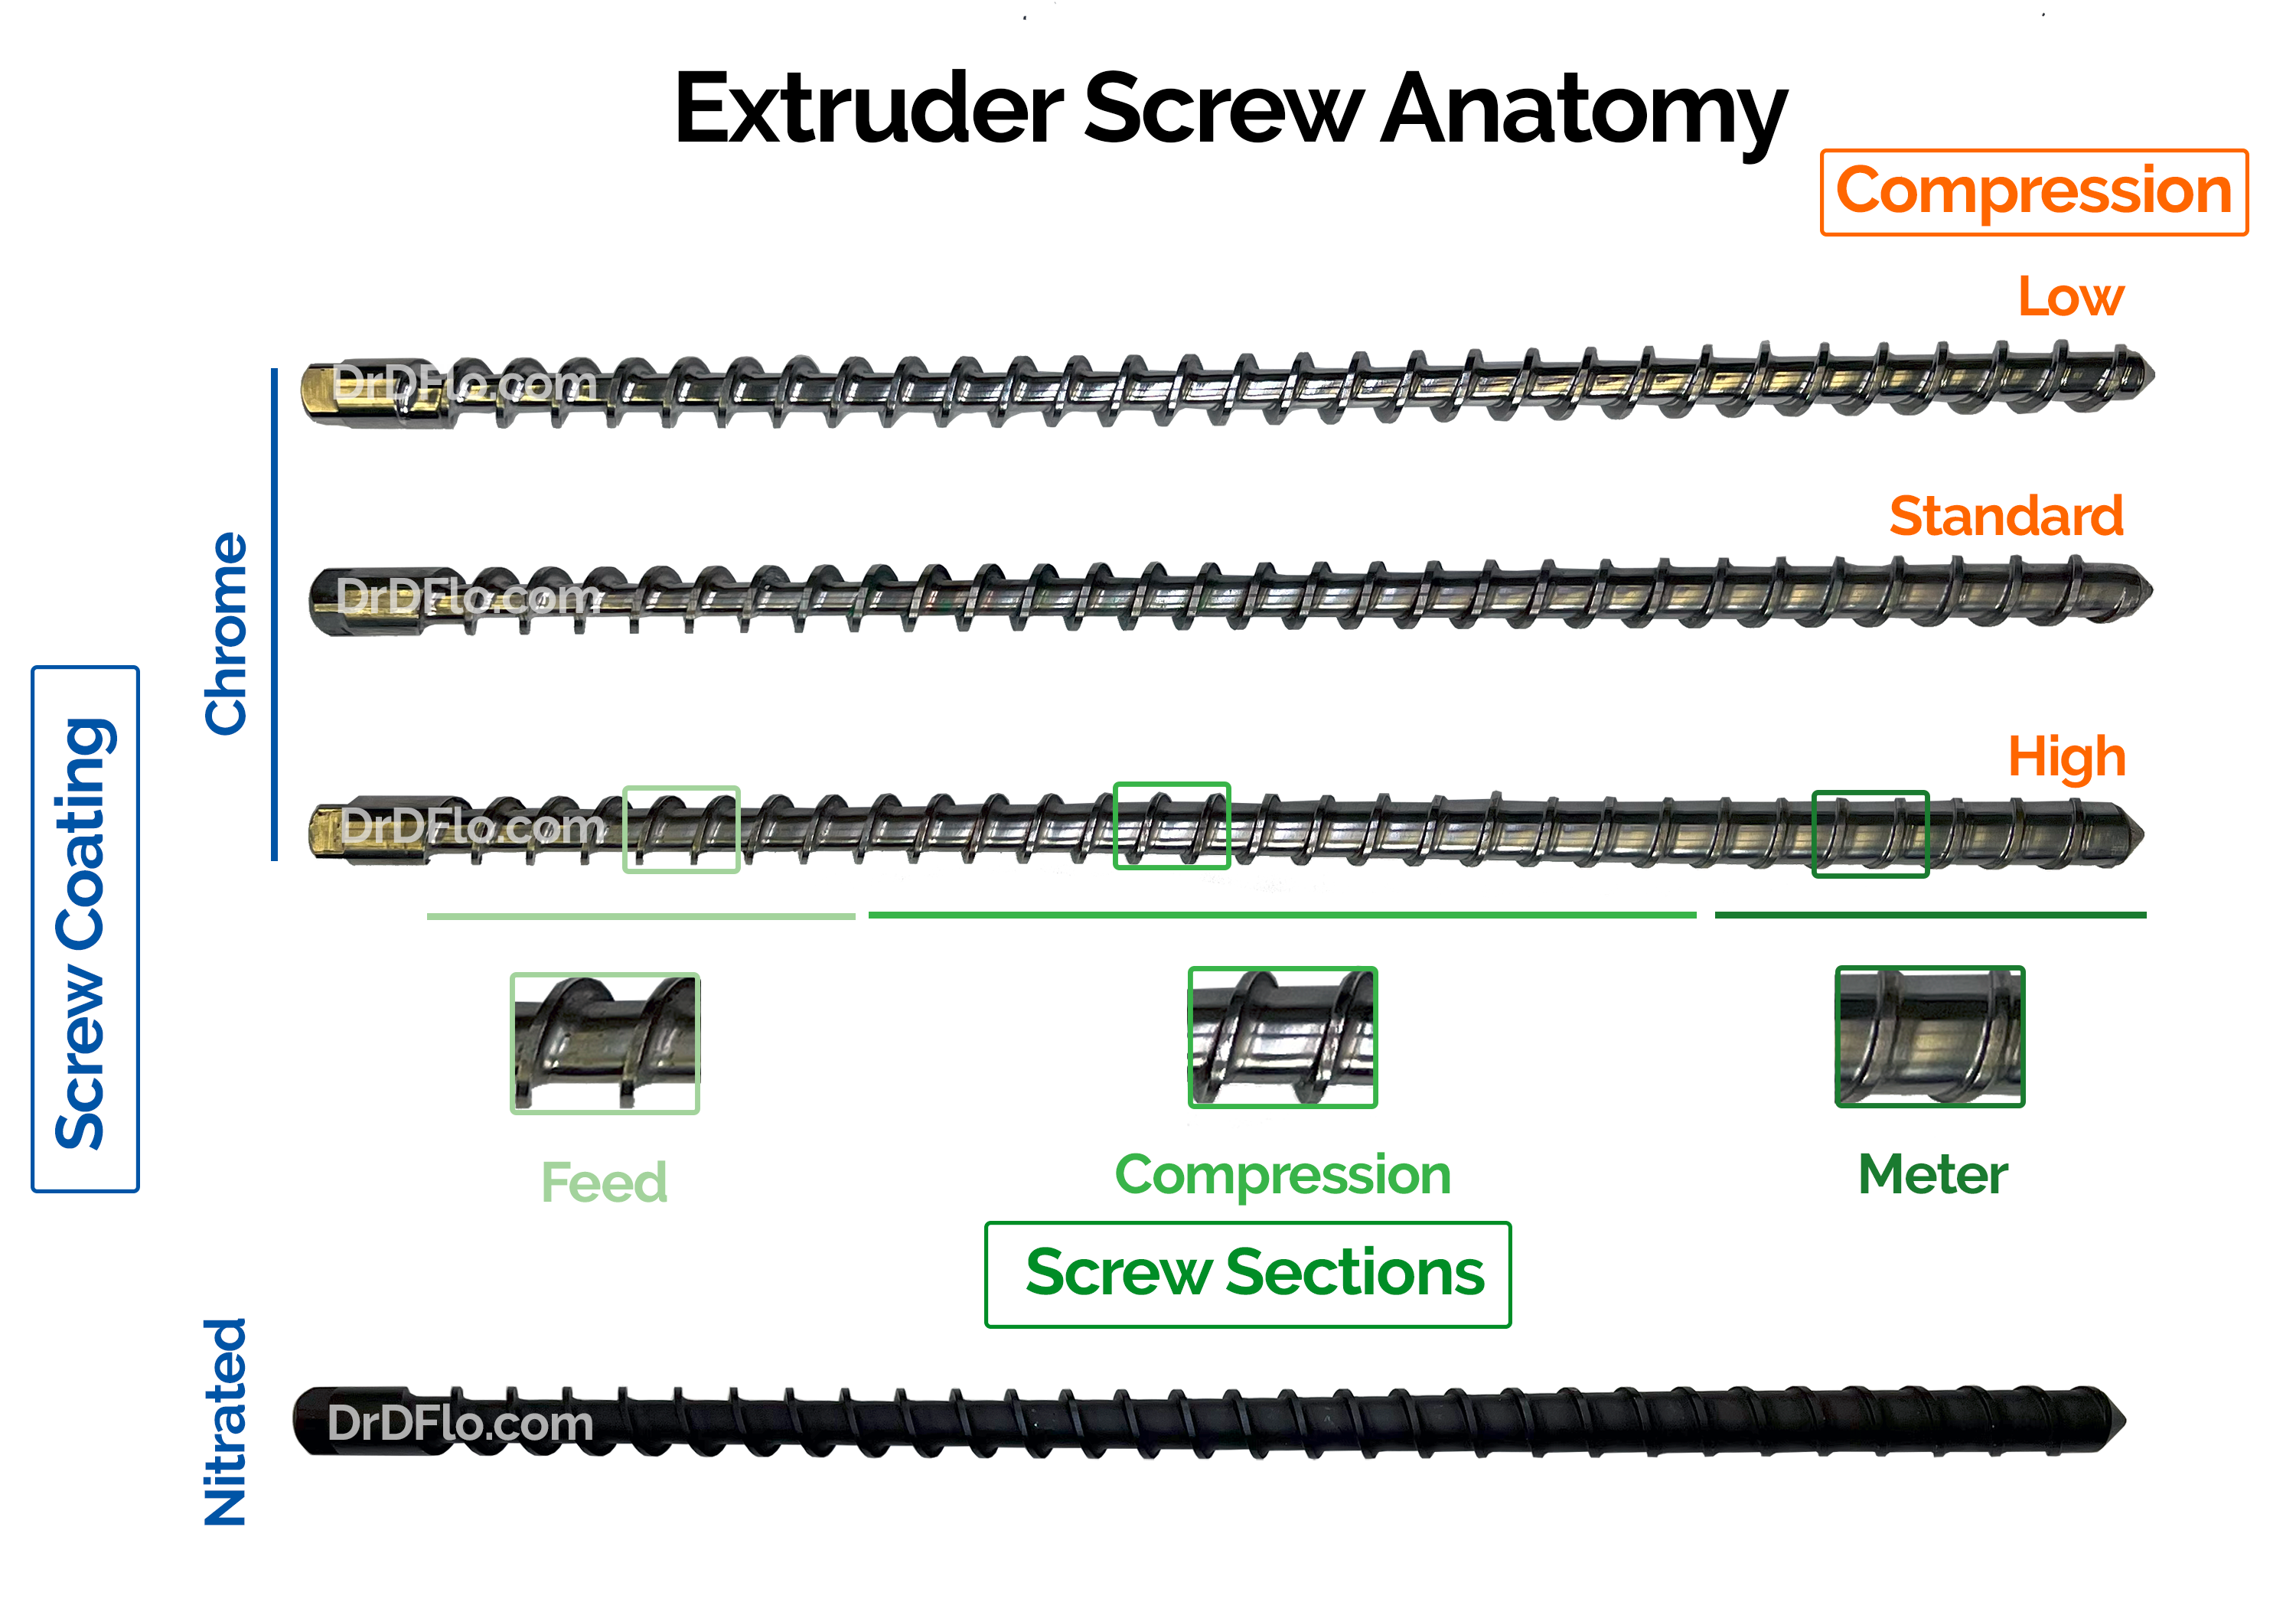
- High lubricity. If the melting material, sticks to the screw, then it will not be conveyed forward. Consequently, extruder screws are often chrome plated to provide a slick surface that promotes material flow down its length. Screws with high lubricity are also less prone to wear and have a longer life.
- Hardness. When extruding composite materials containing carbon fibers or glass particles, a wear resistant screw is needed. Screw manufacturers employ hard coatings, such as nitriding, to protect from wear.
- Tight clearance. There must be clearance between the screw and the barrel it is rotating inside of. However, too much clearance will cause backflow, greatly reducing the output of the extruder. Generally, the ratio of radial clearance to screw diameter is around 0.001. For example, a 1” screw should be paired with a 1.001” bore. It is difficult and costly to hold this tolerance for long screw and barrel lengths, which is why industrial screw extruders are so expensive.
Plasticizing Screw Zones
A tapered screw's geometry consists of three distinct zones: feed, compression, and metering. We will cover the function of each screw section and discuss any problems that could affect the extruder's output.
Feed
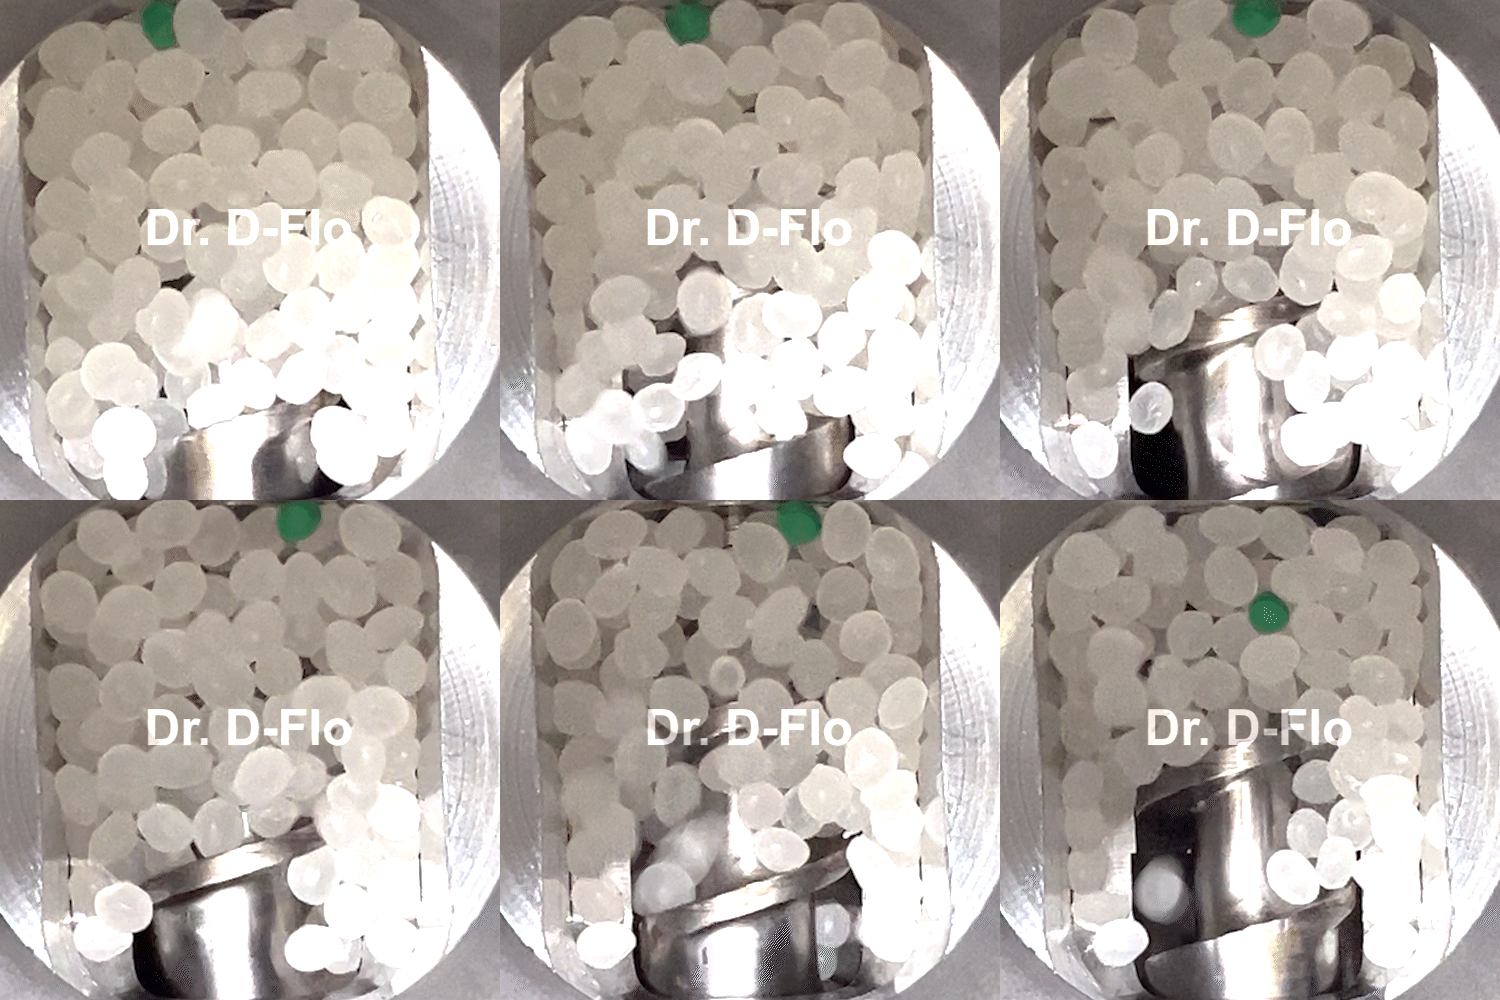
Pellets conveyed forward in the feed section.
Pellets in the hopper follow gravity down until they are situated within the channels of the first flights of the screw. These deep-flighted screw channels begin the feed section. The relative motion between the rotating screw and the stationary barrel pushes the solid pellets forward. The material experiences compaction as it moves past the feed port and becomes enclosed on all sides by the barrel. This compression forces air back out of the hopper. For most of the feed section, the solids are transported with plug flow, where all pellets move at the same velocity.
The bulk properties of the plastic largely affect the conveying efficiency of the solids. Material with low densities (<0.5 g/cm3) are more likely to bridge and plug the feed throat rather than follow gravity. Further, materials with high compressability (i.e., the ability to reduce the volume of the material through squeezing/packing it) can also have feeding issues. Flake from ground up plastic containers often has high compressability. Later in this guide, there is a more detailed analysis of which materials are easy and troublesome to extrude. For now, let's look at problems that can be addressed by modifying the parameters of the feed section.
Observation: The hopper is not consistently draining with pellets or irregular output of the extruder.
Solutions:
- Opt for uniform pellet size and shape to improve feed consistency. Perform an Angle of Repose experiment to determine if the material has sufficient flowability. Observing “funneling,” where the material builds up on the walls and only flows in the middle, is an indication of poorly flowing material.
- Decrease the temperature of the feed throat as material could be prematurely softening and bridging before reaching the screw. A fan or water jacket can be installed to decrease feed throat temperature.
- Use a vibrator to ensure consistent material flow. However, for some materials, a vibrator can exacerbate the problem by leading to compaction.
- Starve feed the extruder.
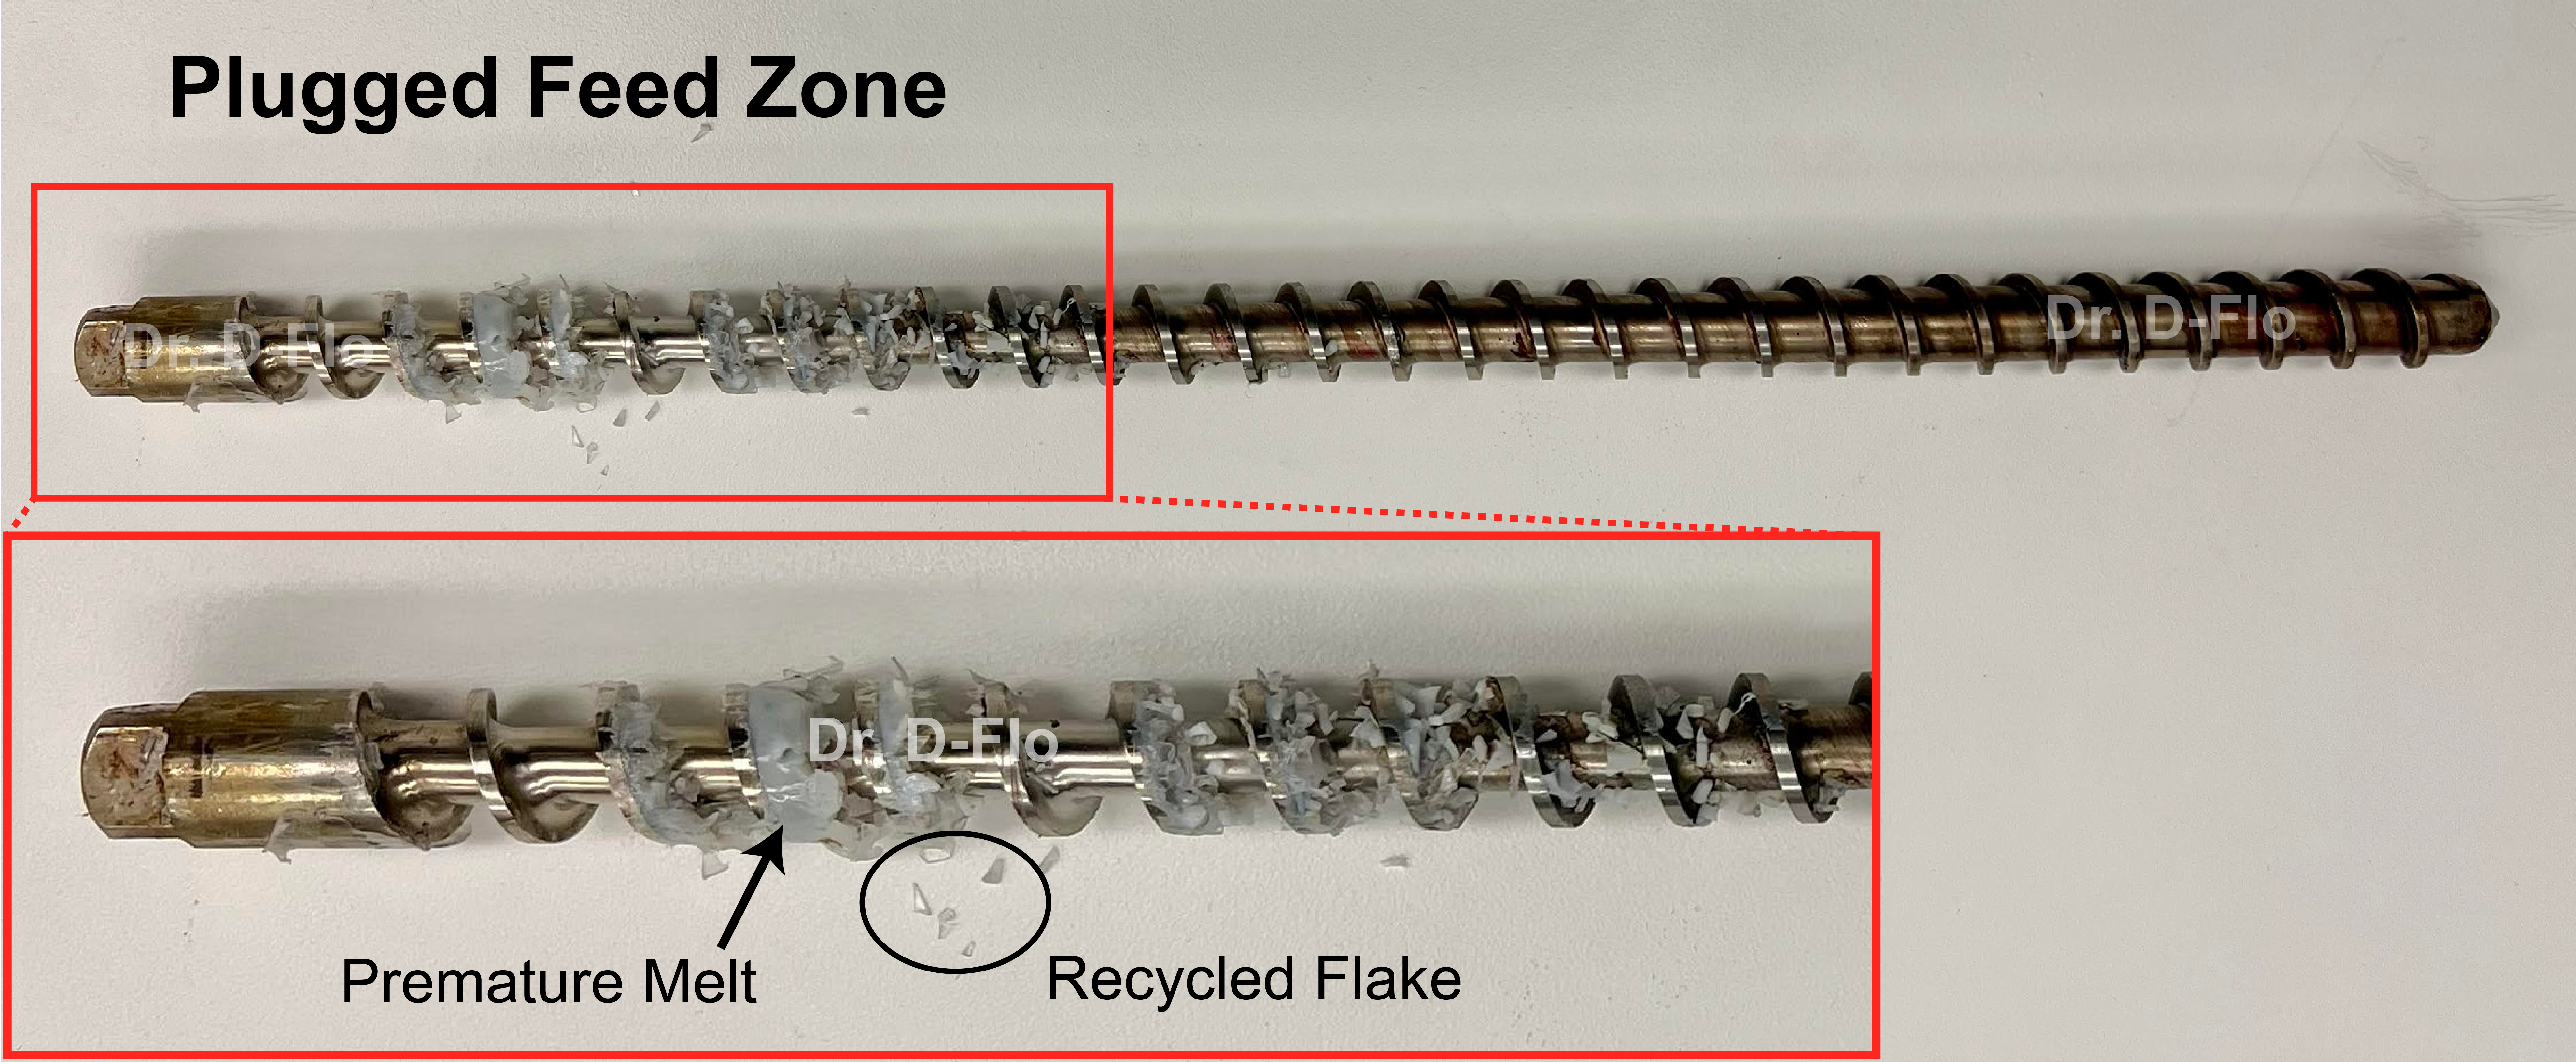
Observation: This issue is often encountered with flake or regrind materials, where the material melts in the feed zone and plugs the extruder (i.e., melt plug). It is difficult to dislodge a melt plug without removing the screw from the barrel.
Solutions:
- Avoid using flake and other low-density, poorly-flowing plastic shapes.
- Lower the barrel temperature in the feed zone.
- Decrease screw speed.
- Teflon-coat the screw to increase its lubricity.
- Use a grooved barrel feed section to increase the friction with the barrel.
Compression
The frictional forces that move the pellets forward also generate heat, which, alongside active heating elements in the barrel, initiates the melting of the material. While some melting may occur in the feed zone, the bulk of the material is melted in the compression region. As the pellets melt, they take up less space. To accommodate this reduction in volume and to ensure consistent forward movement of the molten material, the screw flights decrease in height linearly along the compression section’s length. This gradual reduction in flight height increases the pressure within the barrel, which will be needed to force the molten material out of the end of the extruder through the die/nozzle.
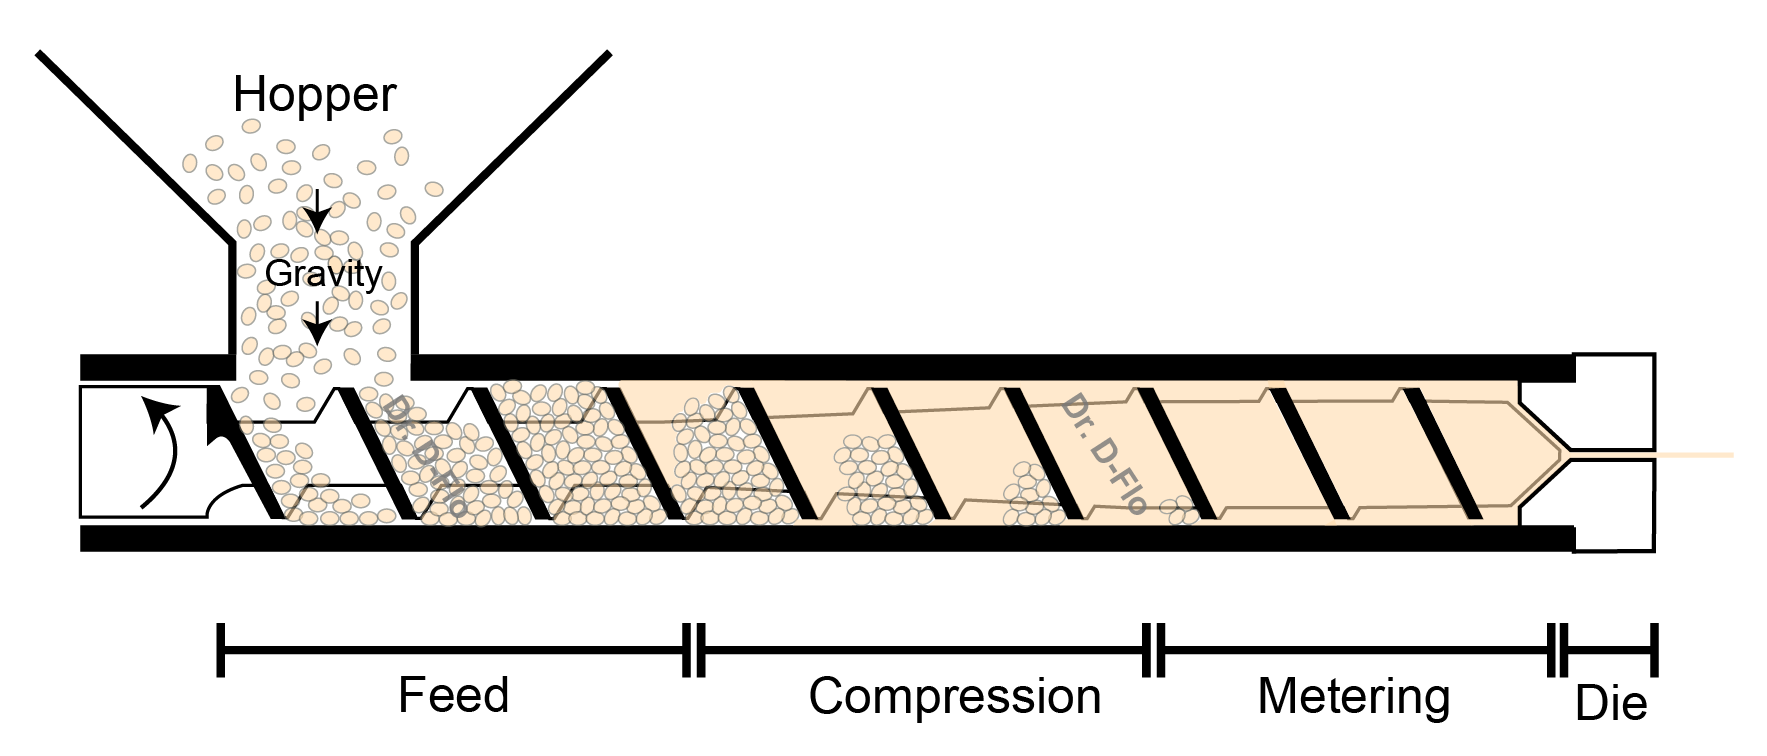
As more of the solids are converted to a viscous melt, drag flow becomes the dominant mechanism for material transport in the compression zone. Briefly, drag flow is the movement of a liquid trapped between a stationary boundary (e.g., the barrel) and a moving one (e.g., the screw), akin to spreading butter on toast, where the knife is moving and the toast is not. While drag flow primarily moves the material forward, it also facilitates the conditions necessary for heating and melting the material, through the friction generated between the material, the screw, and the barrel. Indeed, viscous fluids moving at different speeds experience friction and thermal generation.
Compression Ratio and Material Suitability
It is important to match the compression ratio—the ratio of the channel depth in the feed section to the channel depth in the metering section, typically ranging from 2 to 4—with the material being extruded. A mismatch between the compression ratio and the material can result in premature wear of the screw, plugging of the extruder, or burning of the material. Below is a table of commodity plastics and their recommended compression ratios. However, the compression ratio is determined not only by material type but also by the shape and bulk density of the material. Low bulk density materials require a higher compression ratio. Additionally, the length of the compression section impacts material processing. Most compression sections should gradually taper. Only polymers with high melt fluidity, such as polyamides (nylon), can handle a short and steep compression region.
Table 1: Optimizing Screw Geometry for Plastic Type
| Plastic Type | Compression Ratio | Screw Length | Thermally sensitive?* | Hydroscopic?** |
|---|---|---|---|---|
| Acrylonitrile Butadiene Styrene (ABS) | 2.5 to 1 | Average (24:1) | Mildly | Mildly |
| Polyamide-6 (Nylon-6) | 3.5 – 4 to 1 | Short (20:1) | Mildly | Yes |
| Polyamide-12 (Nylon-12) | 2.5 – 3.5 to 1 | Short (20:1) | Mildly | Yes |
| Polycarbonate (PC) | 2.5 to 1 | Long (30:1) | Yes | Yes |
| Polyethylene High-Density (HDPE) | 3.0 – 3.5 to 1 | Long (30:1) | No | No |
| Polyethylene Low-Density (LDPE) | 3.0 – 3.5 to 1 | Long (30:1) | No | No |
| Polyethylene Terephthalate (PET/PETG) | 2.5 to 1 | Average (24:1) | Yes | Yes |
| Polylactic Acid (PLA) | 2.0 – 3.0 to 1 | Average (24:1) | Mildly | Yes |
| Polymethyl Methacrylate (Acrylic) | 2.0 to 1 | Average (24:1) | Yes | Yes |
| Polypropylene (PP) | 3.5 – 4 to 1 | Average (24:1) | No | No |
| Polystyrene (PS) | 3 to 1 | Average (24:1) | Mildly | No |
| Polyvinyl chloride (PVC) | 2.5 to 1 | Average (24:1) | Yes | No |
** Hygroscopic materials absorb moisture from the air. When wet material is heated in an extruder, the moisture boils, causing voids in the extrudate or, even worse, degradation in materials that are susceptible to hydrolysis. Hydroscopic materials must be dried before extrusion.
Observation: This issue often occurs with thermally sensitive materials (Table 1) that experience overly aggressive compression, such as having a compression zone that is too short or a compression ratio that is too high. The discoloration is a sign of degraded material.
Solutions:
- Use a screw with a longer compression region (more gradual taper) or use less compression.
- Lower the barrel temperature.
- Decrease residence time of the material in the extruder (faster screw speed or shorter screw)
Observation: If the compression or taper of the screw increases faster than the melting of the solids particles, then the extruder will become plugged or the screw will experience increased wear at the screw flights.
Solution:
- Use a lower compression screw.
Metering
The final geometric zone of the screw is the metering section, which is also known as the conveying or pumping zone. The flight depth remains constant across this section to achieve a stable transport before the material exists from the die.
In the metering section, mixing can occur because all solid particles have already dissolved. Mixing is crucial in compounding applications where small amounts of colorants or other additives are added to the hopper and need to be uniformly distributed throughout the final product. As the screw rotates, the polymer melt experiences a natural spiraling motion that helps blend all components together. Additionally, mixing is essential for achieving a uniform melt temperature throughout the molten polymer. Special mixing geometries may be incorporated in the metering zone to enhance mixing efficiency.
Barrel Heating Zones

The distinct geometric sections of the screw align with specific heating zones along the barrel. Although the barrel is a continuous tube, the relatively low thermal conductivity of its steel construction and the heat loss to the material inside the barrel allow for distinct temperature regimes to be established using seperate barrel heaters and thermocouples.
Perhaps the most common question is: why do we even need temperature zones? Shouldn't the barrel heaters just be set to a temperature above the melting point of the material? This is a great question, often asked by those accustomed to setting their filament printer extruder to a value much higher than the melting point of the plastic. For example, PLA melts at approximately 160°C, but printers commonly extrude this material at around 210°C. The difference between a screw extruder and a filament extruder is that while a filament extruder’s heaters account for 100% of the energy that melts the material, the barrel heaters in a screw extruder only account for 10-20%. Consequently, barrel heaters in a screw extruder are set much closer to the melting point of the polymer leading to less degradation.
The role of the barrel heaters is more nuanced, serving three purposes:
- Initiate Melting in the Feed Section: Some amount of material must melt before viscous shear heating can begin.
- Regulate Temperature in the Compression Region: As the screw tapers, providing less space for the pellets and molten material, increased heat generation is observed in this region due to the higher shear forces. While it may seem counterintuitive, a higher barrel temperature will lower the viscosity of the molten material near the barrel wall, leading to reduced shear heating. Conversely, a lower barrel temperature increases the viscosity, resulting in higher shear heating.
- Tune and Stabilize the Viscosity of the Extrudate in the Metering Section: Depending on the application, it may be desirable to have a more fluid extrudate. Adjusting the barrel temperature in the metering zone can fine-tune the viscosity, ensuring the material flows as required for optimal extrusion performance.
Setting the Zone Temperatures
Often when purchasing pellets, the manufacturer will supply a runsheet with starting values for the temperatures of a three zone extruder. Start with these values, but we will take a look at some signs of when the temperature zone is set incorrectly.
Feed Section Heaters: The feed section heaters should initiate the softening/melting of the plastic pellets. However, too high of a feed section temperature will cause too much melting leading to a plug in the feed section. This zone is typically set below the plastic’s melting point to prevent complete melting. Conversely, too low of temperature can increase the pressure inside of the extruder because the material melting rate is not matching the reduction in available volume along the taper of the screw.
Compression Section Heaters: As mentioned previously, the barrel temperature of the compression section affects the amount of shear heating by changing the viscosity of the polymer near the barrel wall. Higher temperature results in lower viscosity leading to decreased shear heating. With reduced shear heating, the solid particles may not be fully melted by the time they reach the metering section. The compression region should be set at or slightly above the melting temperature of the polymer to ensure complete melting.
Metering Section Heaters: The temperature in this zone should be set above the melting point of the polymer to ensure a consistent and uniform melt. Proper temperature control in the metering section ensures that the melt has the right viscosity and flow characteristics for the final extrusion process. Typically, the metering zone is set slightly higher than the compression zone to ensure that any remaining solid particles are fully melted, and the polymer is well-mixed.
EX6 Extrusion Temperatures and Tips
While the exact temperature settings will vary depending on the setup of your screw extruder, you can get a ballpark idea for setting your metering, compression, and feed zones by looking at my protocol sheet for the EX6 extruder. Download PDF Here
Die, Breaker Plate, and Filters
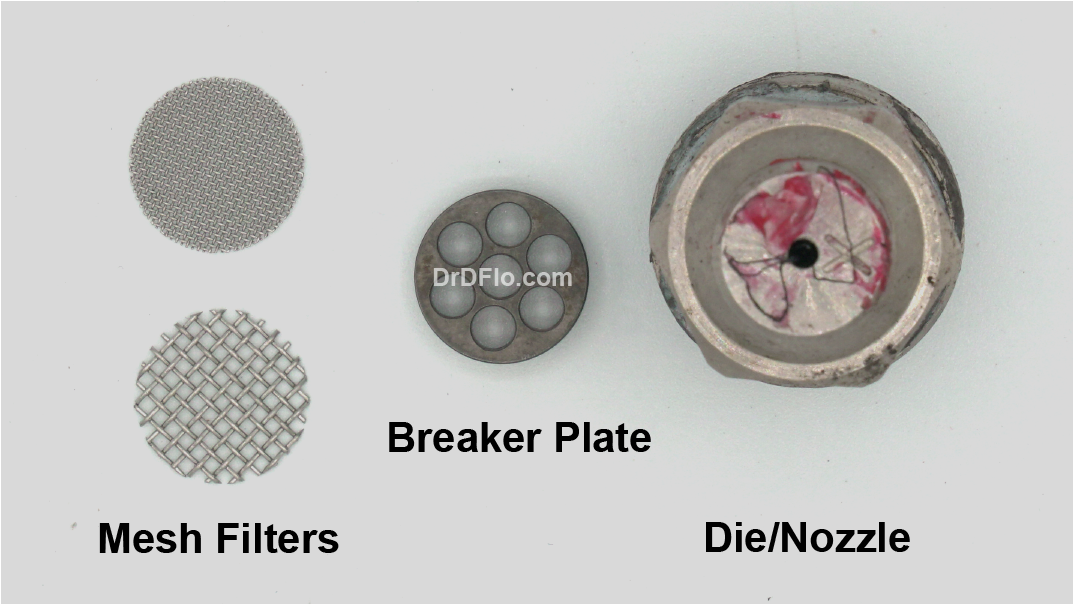
After reaching the final flight of the screw, the molten plastic is under tremendous pressure. Before it can exit, it must pass through the filter mesh, breaker plate, and die.
Mesh Filter
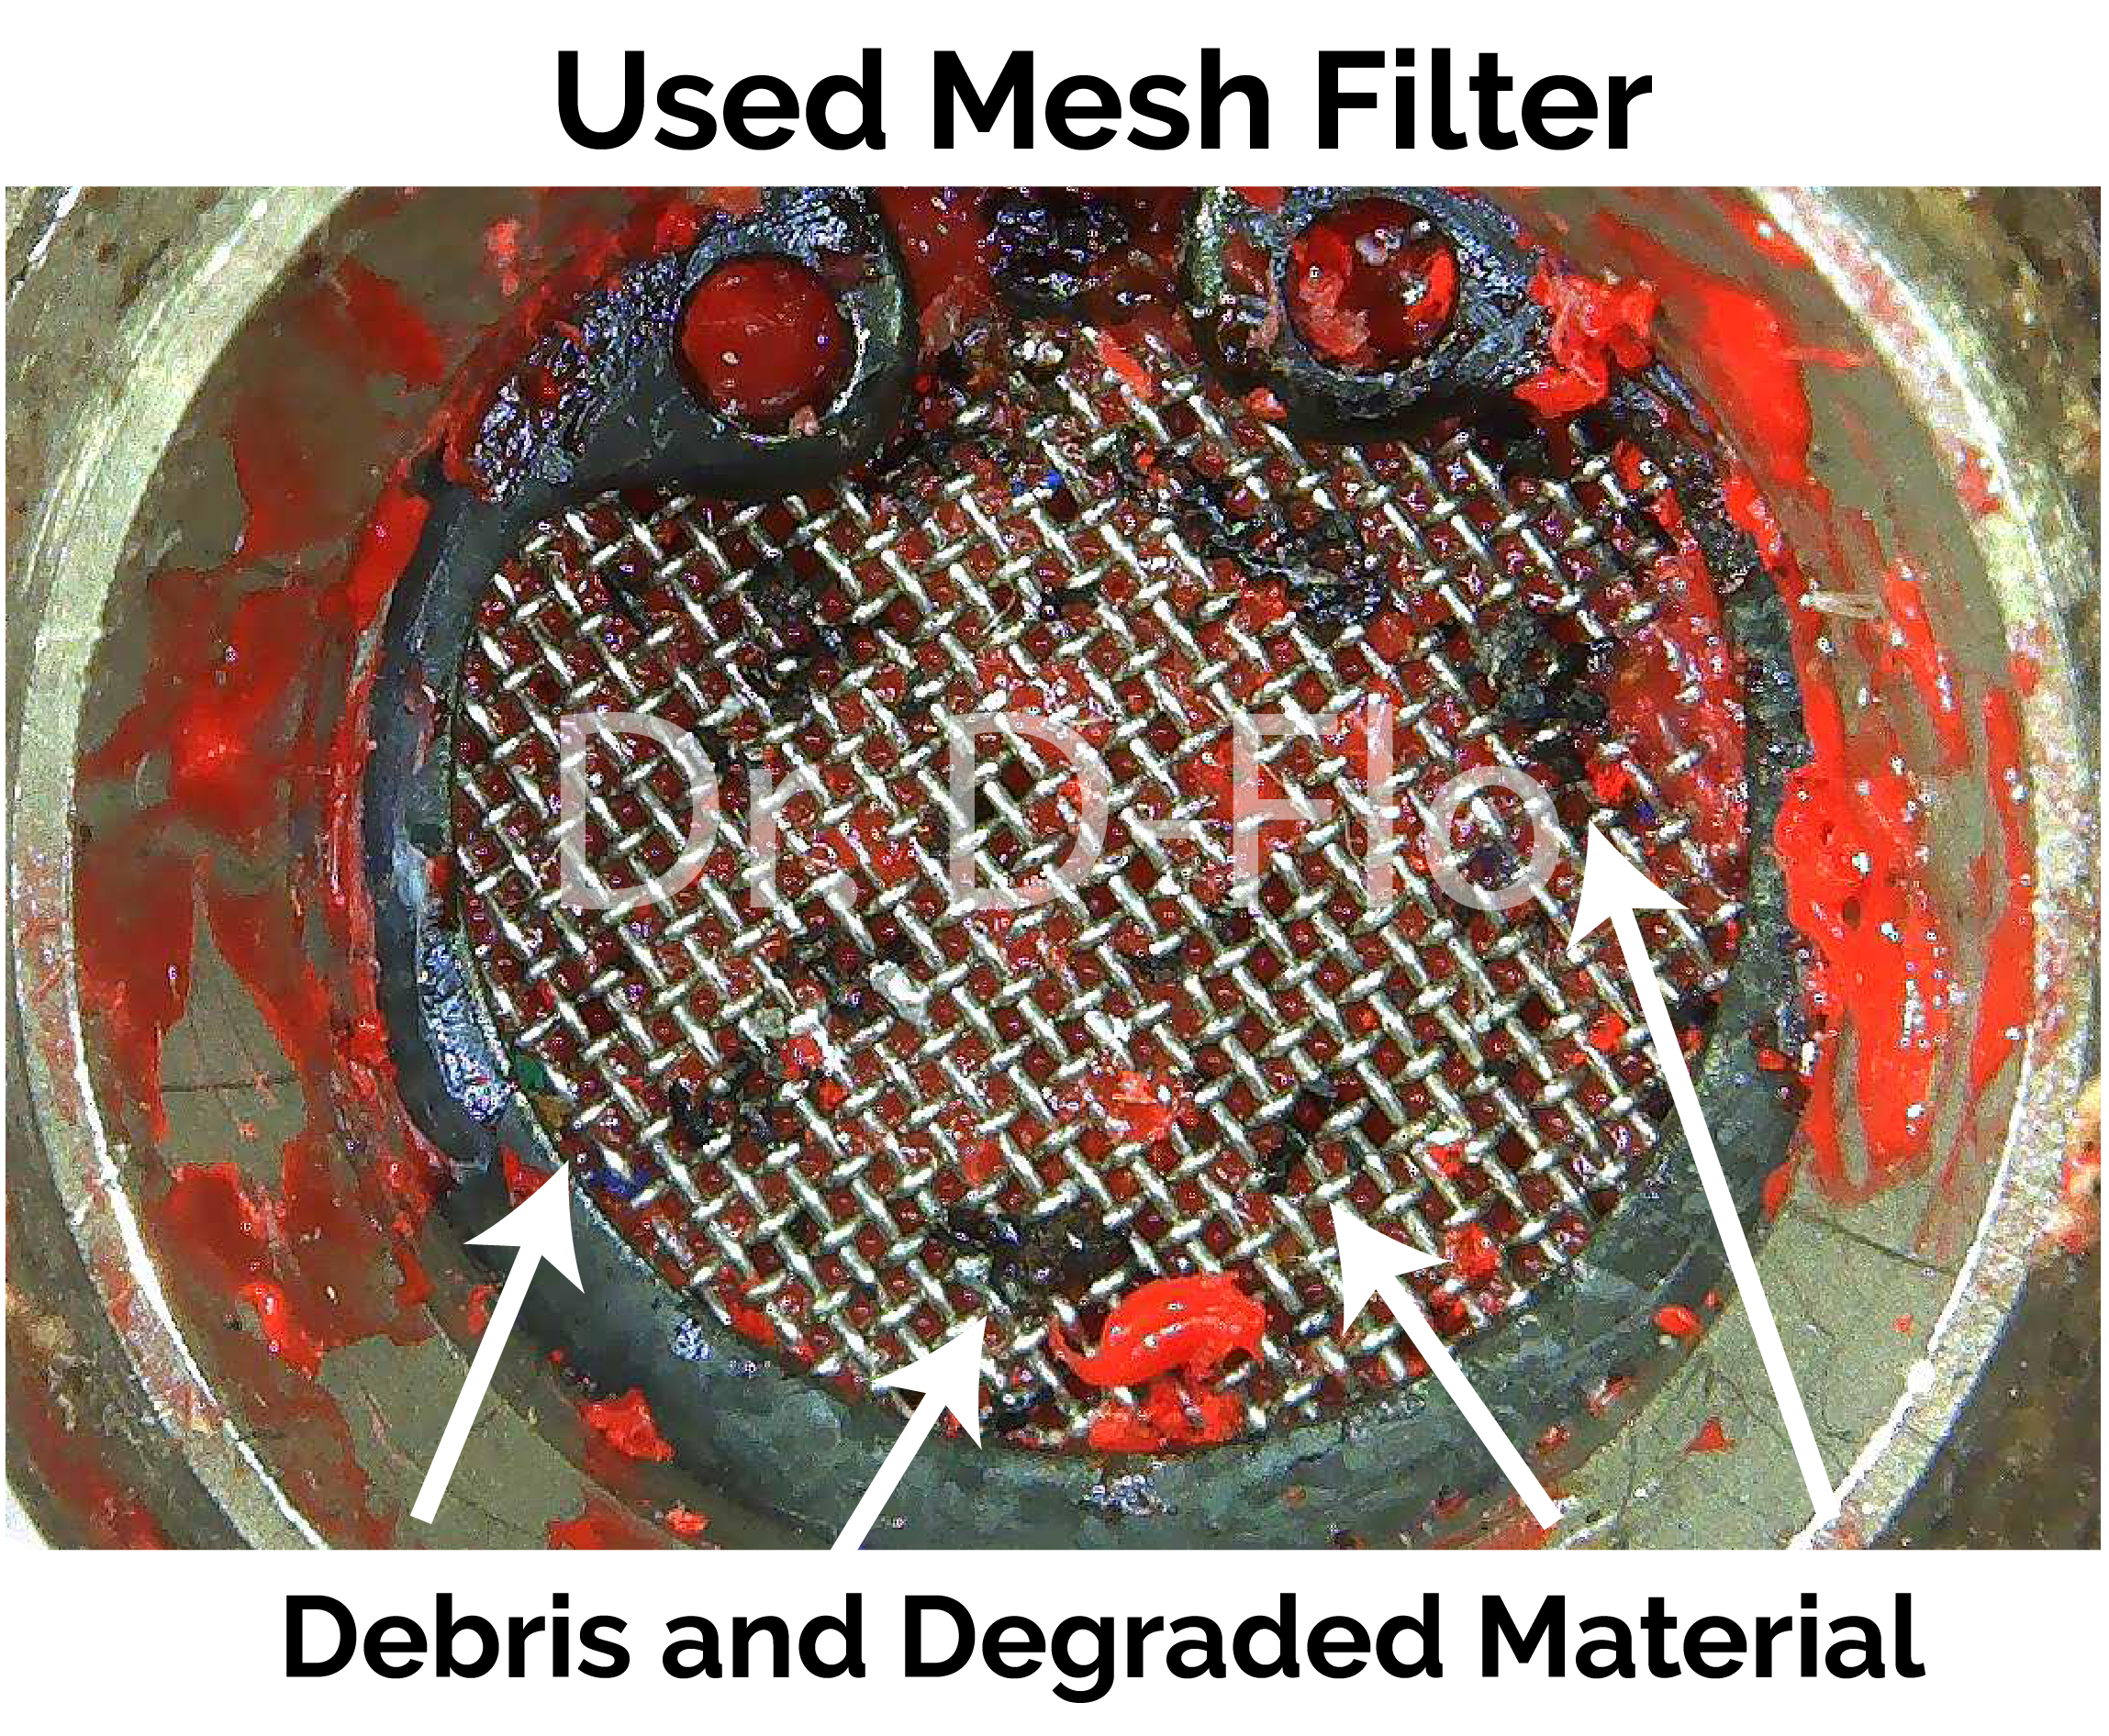
Perspective of the mesh filter from the molten plastic before it exits out the die. Debris and contaminates will slowly plug the screen.
The filter mesh prevents contamination and un-melted particles from leaving the extruder by allowing only particles smaller than the mesh voids to pass through. If extruding 3D printer filament, then the mesh holes need to be smaller than the exit diameter of the print head’s nozzle to prevent clogging. Finer meshes result in a cleaner extrusion stream but generate more backpressure for the motor to overcome, as they constrict the exit space. However, increased backpressure can also be beneficial as it enhances mixing in the metering section.
Over time, the mesh will plug with contaminates, leading to a slowly rising backpressure that must be overcome with an increased extruder screw speed to maintain consistent dimensions of the extrudate. Eventually this mesh will have to be replaced. For highly contaminated feedstocks, such as recycled material, automatic screen changers are a must to prevent significant downtime.
Breaker Plate
The breaker plate is a round, perforated plate located near the end of the extruder barrel. It prevents the filter mesh from collapsing in on itself and features straight holes that help eliminate the rotational memory of the polymer melt. This prevents the extrudate from curling up upon exiting the die.
Die
The die or nozzle design determines the shape of the extruded plastic. For example, flat dies are used to create plastic sheets, while annular dies are used to form pipes. For simplicity, this article will assume a round exit geometry for extruding filament or large format printing. It is important to note that smaller dies require a stronger motor to turn the screw and force the same amount of plastic through as larger dies.
Virgin Pellets
Virgin or new plastic pellets are cheap and easy to buy. As with other commodities, the larger the quantities that you can purchase, the more cost savings that can be realized. However, keep in mind that gaylords (1000 lbs) and bulk packs (4000 lbs) will require freight shipping and a pallet jack. My favorite vendors for pellets that can be shipped residential (<50 lbs) are Filabot, 3DXTech, and McMaster-Carr.
Drying
Animated comparison of extruding wet vs. dried pellets. Wet pellets cause an irregular, bubbly extrudate due to the water vapor boiling and turning into gas.
When you take delivery of your pellets, assume they are “wet.” Most plastics are hydroscopic and readily absorb water out of the air (Table 1). Hydroscopic material must be dried before extrusion or else the absorbed moisture will turn to steam in the extruder. Extruding wet material will cause voids, bubbles, and numerous other surface imperfections. If the water content is high enough, the extrudate will foam.
For small amounts of pellets, a normal oven can be used to dry them. However, for larger quantities, you will need a way to circulate the air inside the oven to remove the moisture. In industrial applications, a pellet dryer is typically used for this purpose. Consult the technical datasheet to determine the appropriate temperature and duration for drying the pellets. After drying, the pellets should be quickly extruded or stored in a sealed container. Some plastics, like PET/PETG, absorb enough water to affect the extrusion process in just 15 minutes. These temperamental plastics typically require a heated hopper or an extruder with vents to release the steam.
I store my dried pellets in a 5-gallon bucket with a Gamma Seal lid and include a rechargeable desiccant bag.
Colorant
Virgin plastic material typically has a clear or yellow translucent appearance. Adding colorants to plastic pellets is a common practice to achieve a specific aesthetic or functional purpose. Colorants can enhance the visual appeal of the final product, making it more attractive and marketable.
Colorants can be introduced into the base plastic in several ways. One option is to purchase pre-colored plastic pellets, where the material is already the desired color. These pre-dyed pellets can be added to the extruder without concerns about mixing or feeding issues. However, the downside is the need to store large quantities of each color you wish to use.
A more economical method is to use color concentrates, which are pellets containing a high percentage of colorant in a compatible carrier resin. Each concentrated pellet can color approximately 100 base plastic pellets. This approach allows you to maintain a large stockpile of virgin material and small bins of colorant, offering greater flexibility and cost efficiency. However, it's important to ensure that the dye type and the carrier resin are compatible with your base plastic. I purchase my colorant from McMaster-Carr, which clearly lists compatibility.
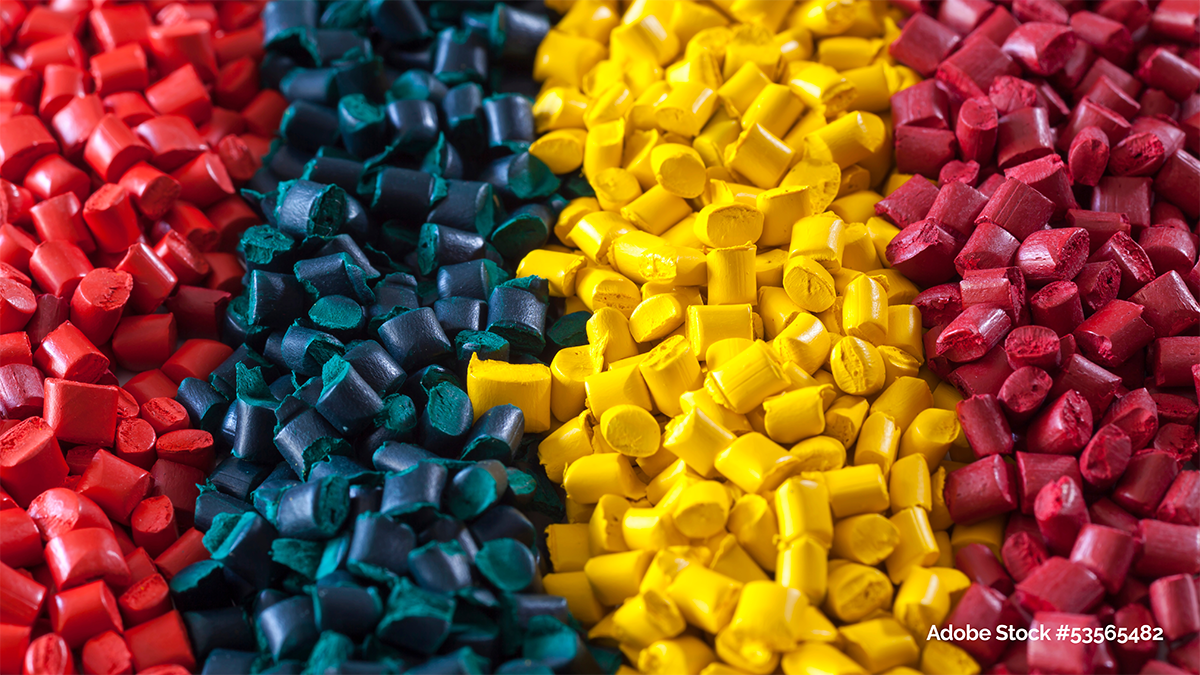
In addition to selecting a compatible colorant, you must also consider feeding and mixing. When the pellets and color concentrate go down the hopper, they must be introduced to the screw at a 1:100 ratio; otherwise, the extrudate will exhibit an irregular color. Color concentrate that is smaller, lighter, or more prone to electrostatic interactions may feed differently and might require a special hopper. I find that colorant manufacturers are always happy to discuss compatibility and troubleshoot feeding issues if you give them a call.
Additives
While many would describe plastic products as flexible, tough, and weather-resistant, these properties often arise from additives included in small quantities alongside the base plastic pellets. These additives include:
- Plasticizers: Increase flexibility
- UV Inhibitors: Prevent degradation in sunlight
- Heat Stabilizers: Protect polymers during processing
- Flame Retardants: Resist combustion
If you have ever used the same type of 3D printer filament from different brands and observed differences in print quality or mechanical properties, it is likely due to variations in the types or quantities of additives used by the manufacturers. It is important to note that additives are typically introduced in small ratios to the base resin, often making up only a fraction of a percent of the total material. Excessive additives can have a deleterious effect on the extrudate. The simple screw extruder we discussed does not have the ability to uniformly mix small quantities of additives. For this reason, it is recommended to purchase masterbatch pellets, which include all necessary additives in a concentrated form, including colorants. Masterbatches are typically made-to-order and can be purchased from Americhem, Ampacet Corporation, Techmer PM, and US Masterbatch.
Fillers
Unlike additives, which are used in small quantities to impart specific properties to plastic products, fillers are often introduced in much higher quantities. Fillers are used not only to enhance the performance characteristics of plastics but also to reduce costs by extending the base material. These functional fillers play a crucial role in improving mechanical strength, electrical and thermal conductivity, density, barrier properties, and more. The higher volume of fillers required makes it essential to ensure compatibility with the base resin to achieve the desired properties without compromising the material's integrity. Here are some common types of functional fillers:
- Reinforcement Fillers: Improve the mechanical strength (carbon fiber and Kevlar)
- Conductive Fillers: Enhance electrical and thermal conductivity (graphite)
- Density Modifiers: Increase the density of plastic products for vibration damping or stability (barium sulfate and magnetite)
- Barrier Fillers: Improve the barrier properties of plastics, making them more resistant to gases and moisture (calcium carbonate and talc)
Compounding base plastic pellets with high percentages (>15%) of filled material can be challenging without a specialized hopper that can feed the material separately at the correct rate. Due to these difficulties, it is recommended to purchase pre-compounded fiber-filled pellets from vendors such as 3DXTech. Remove the mesh filter before processing fiber-filled pellets.
Contamination
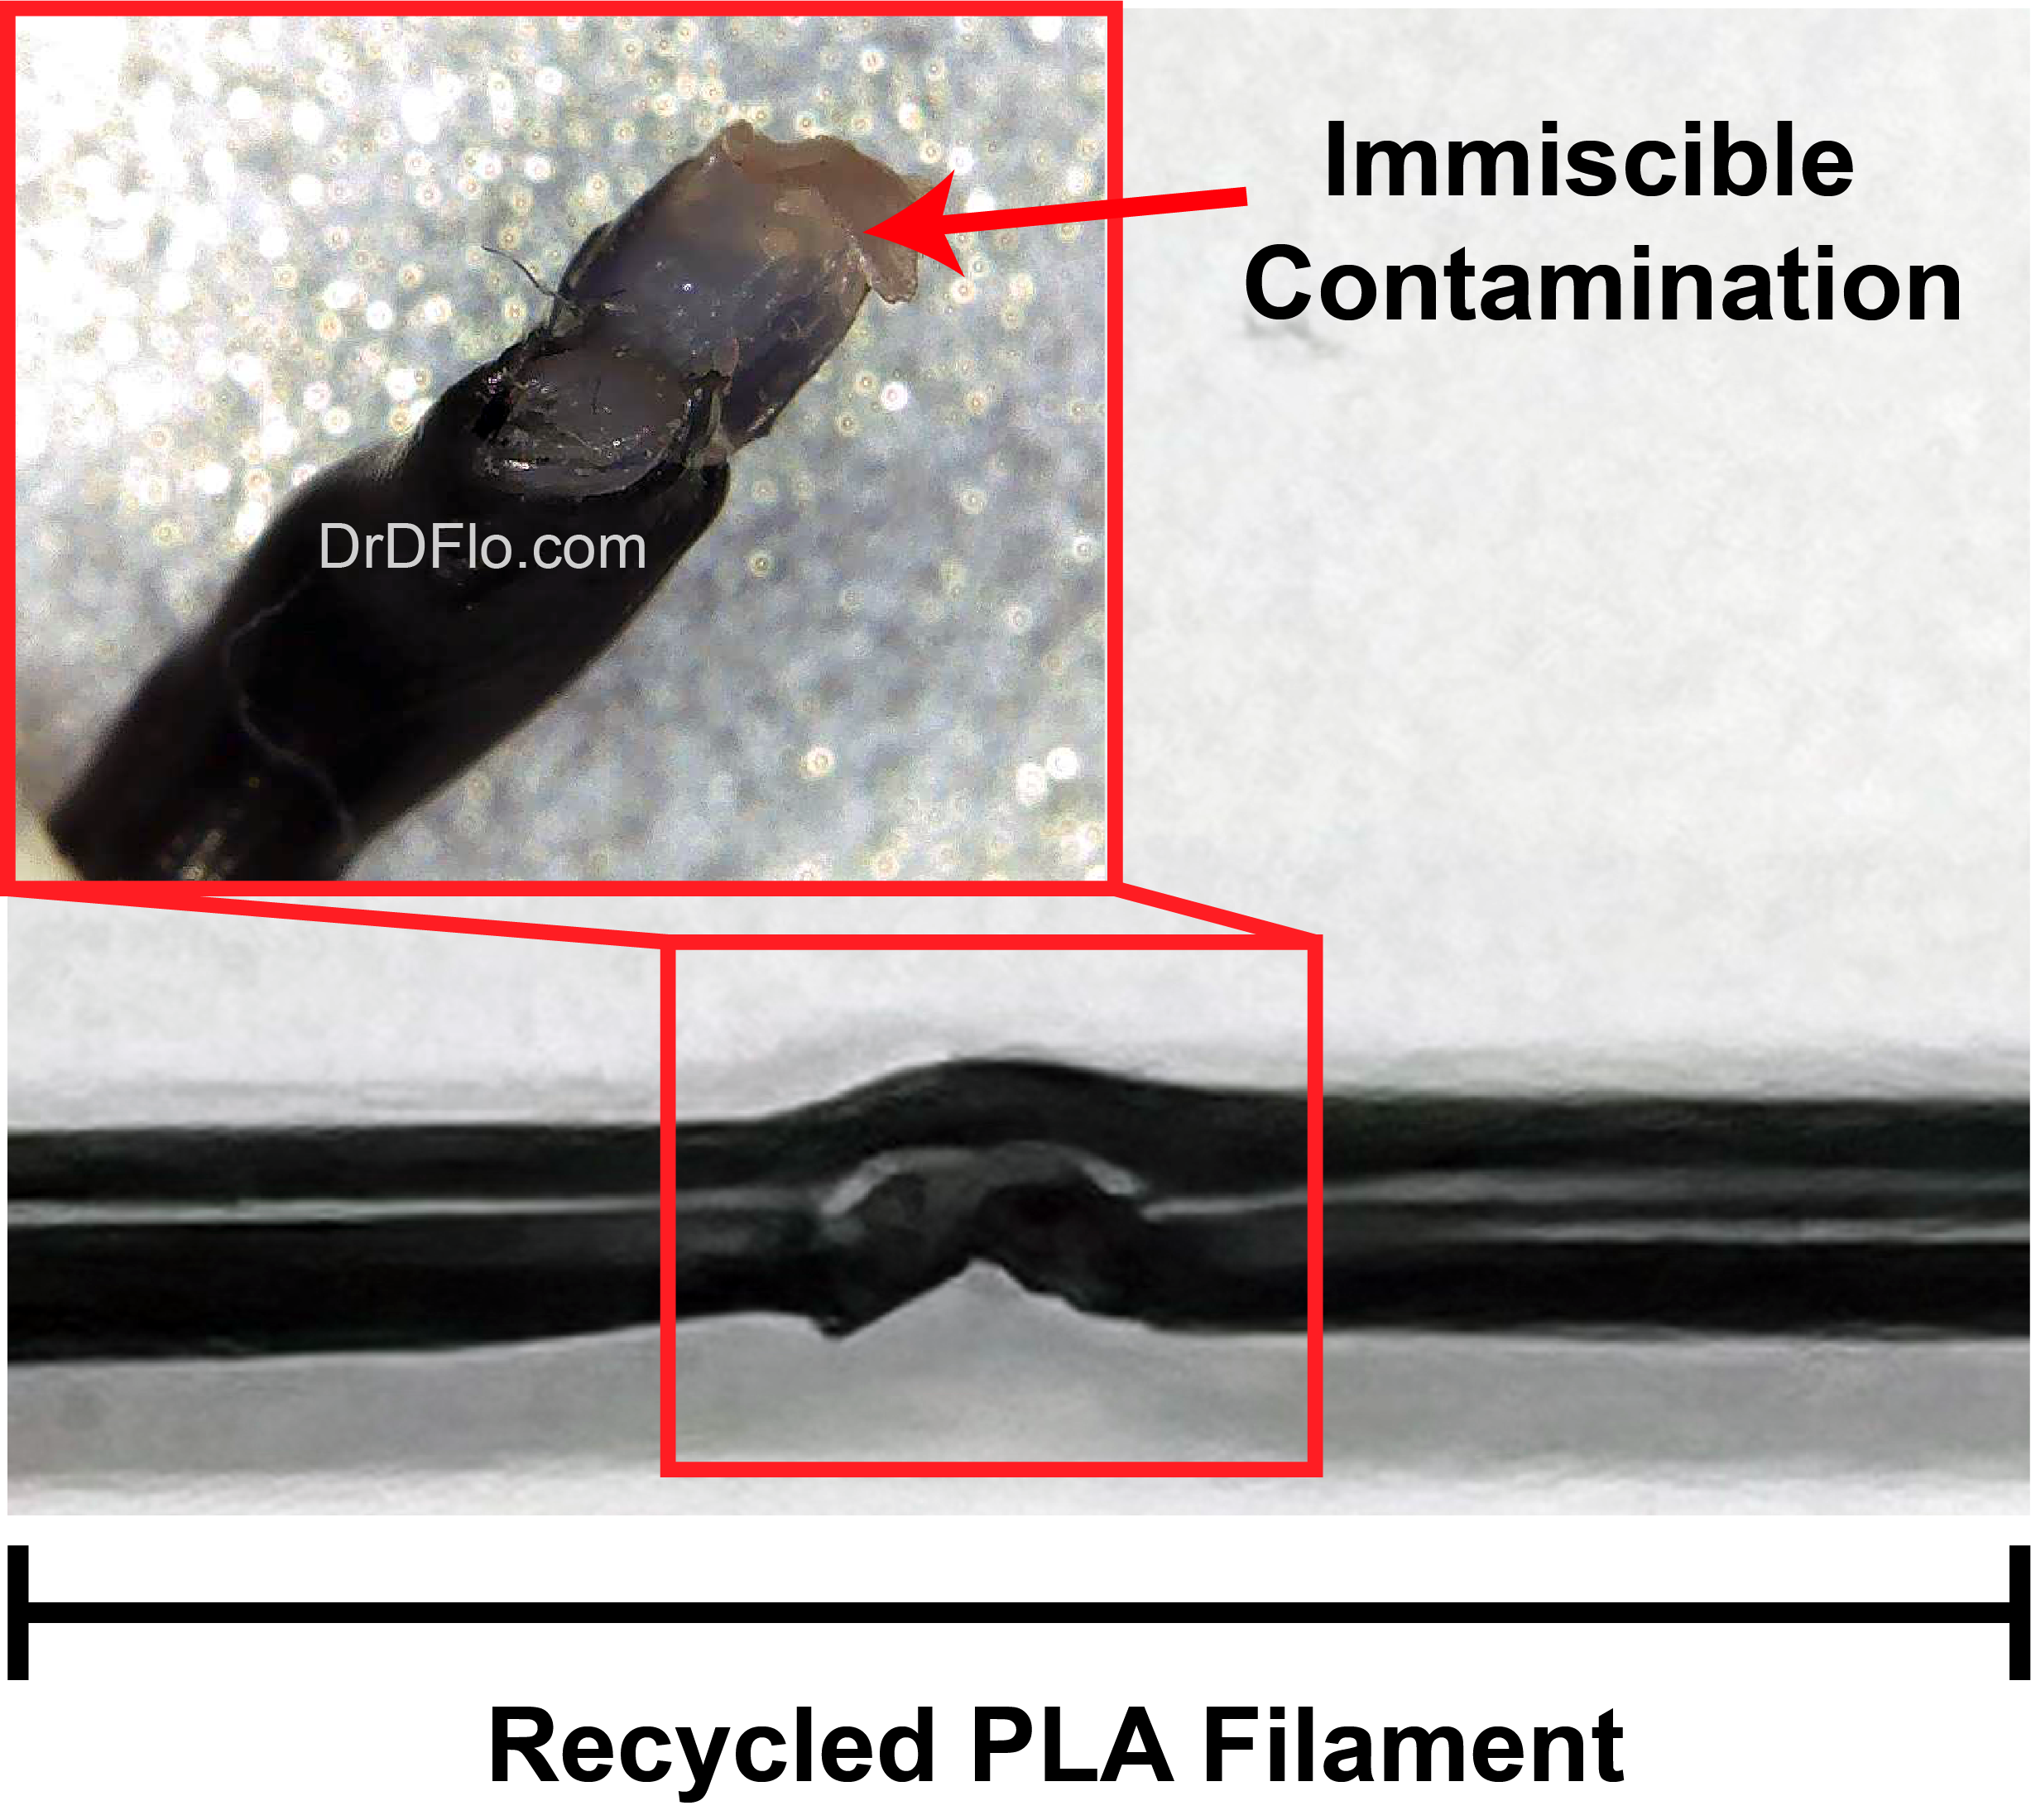
Incompatible plastic from a previous run present in the extrudate.
Contamination in extrusion processes refers to the presence of any foreign material that deviates from the base resin, potentially causing issues during melting or affecting the mechanical properties of the final extruded product. Contaminants can originate from residual plastic from previous runs or foreign materials that have ended up in the pellets. Residual plastics, if not fully purged, can cause color streaks, inconsistent mechanical properties, and poor surface finish. Similarly, foreign materials can introduce unexpected variations in the melt flow and mechanical integrity of the extrudate.
Preventing contamination requires thorough purging and cleaning of the extruder to remove any remnants of previous runs when switching to new materials. It's also crucial to keep plastics in sealed bins to avoid foreign materials mixing with the pellets. An indicator of material contamination is the increasing motor power needed over time due to the filter plugging up. This issue is particularly challenging with recycled materials, where contamination control is more complex and will be discussed next. By maintaining clean equipment and properly storing materials, you can minimize contamination risks and ensure consistent, high-quality extrusion outputs.
Recycled Material
Many, including myself, are drawn to at-home screw extrusion due to the accumulation of plastic waste from filament 3D printers and plastic containers. While it may seem like you have access to an untapped stockpile of free plastic, the process of converting this material back into 3D printable filament or functional parts via injection molding presents significant challenges. There are three main obstacles to overcome:
- Degradation: Used plastic parts and containers may be degraded due to exposure to chemicals (e.g., cleaning products) and sunlight. Additionally, each heating and cooling cycle causes some degradation, primarily due to oxidation (presence of oxygen) or hydrolysis (presence of water) during extrusion. To preserve mechanical properties, it is often necessary to mix recycled material with new material.
- Shape: Re-extruding old parts and containers requires them to be ground up to fit between the flights of the screw. This regrind is more irregular than virgin pellets, with varying packing density. Consequently, each screw turn feeds a variable mass of material into the extruder, causing an irregular output. Often, recycled material must pass through the extruder twice: first to convert the plastic waste stream into an irregular strand, and then a second time, after pelletizing (cutting the strand into ~3mm lengths), to achieve a uniform strand. Learn more about pelletizing and re-extruding here.
- Contamination: As discussed above, contamination from dissimilar plastics can plug the extruder and cause irregular extrusion. Without proper sorting, it is very difficult to determine which plastic is which, as most common 3D printable plastics have similar densities. It only takes one piece of incorrect plastic, crushed up and blended into a bulk regrind, to compromise the entire batch of recycled material. Proper sorting and identification are crucial to prevent contamination and ensure consistent, high-quality recycled filament or parts.
Irregular extrusion of recycled PET water bottle flake.
So, how do we get around these obstacles? Unfortunately, besides mixing in a small percentage of new material to overcome degradation (Obstacle #1), industrial machines are often required to handle irregular material and sort out different types of plastics. These machines can grind plastic into uniform particles, ensuring consistent feed rates and extrusion quality. Additionally, advanced sorting technologies, such as near-infrared (NIR) spectroscopy, can accurately identify and separate different types of plastics, preventing contamination and ensuring the integrity of the recycled material. Addressing these challenges effectively requires a community effort, involving local recycling facilities and collective investments in specialized sorting and grinding equipment.
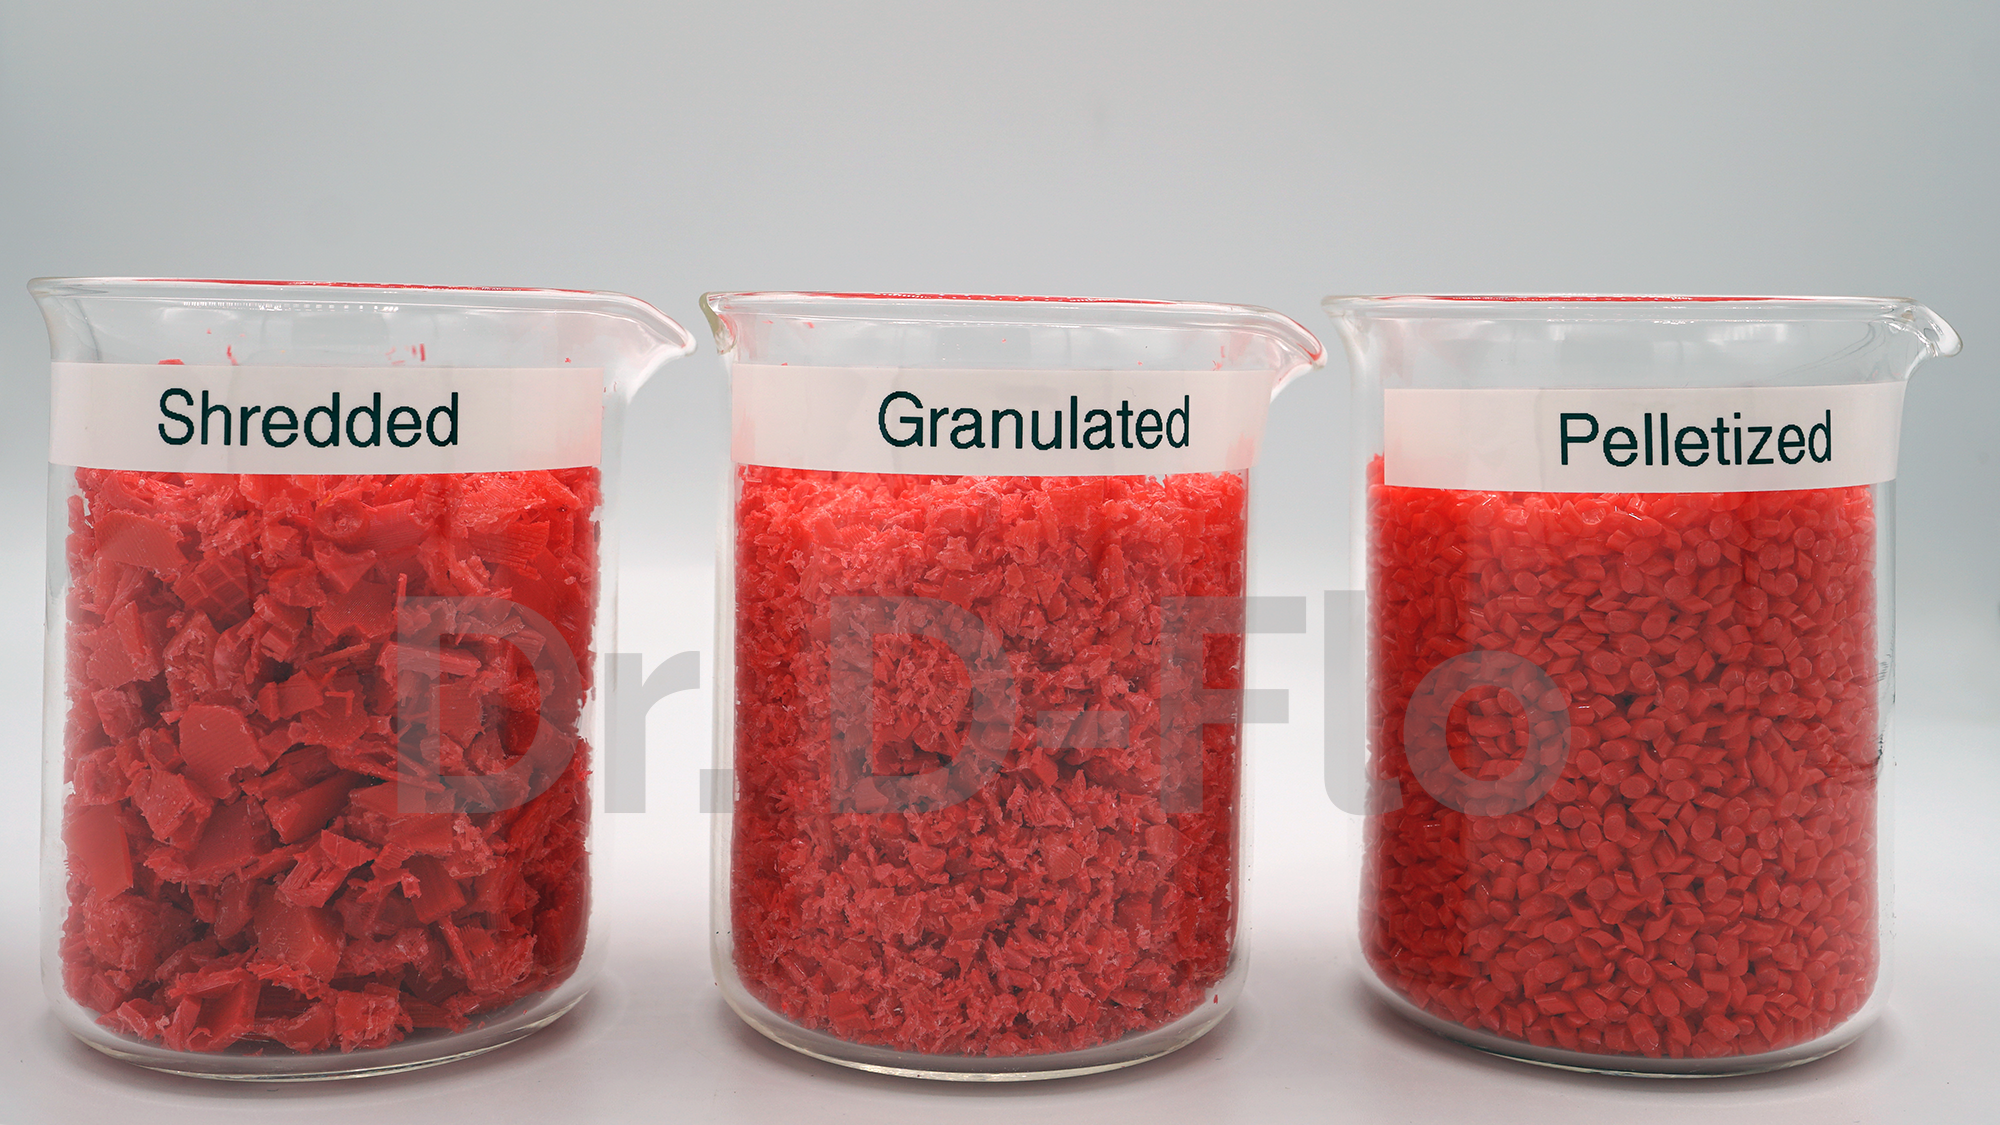
To re-extrude recycled material, stary by shredding the waste plastic, then granulating it, then extruding, then pelletizing, and finally, extruding once more.
Open-Source Content
Dr. D-Flo’s #1 priority is ensuring uninterrupted access to his digital fabrication content for everyone. Information and project files are free without any intrusive advertisements. The goal of this website and YouTube channel is to inspire more makers, DIYers, machinists, fabricators, and engineers as we need physical solutions for many of the problems facing our society.
If you find yourself in a position to contribute, we would greatly appreciate your support through becoming a YouTube channel member, a one-time donation, or purchasing your tools through Dr. D-Flo’s Amazon store.
Let's Keep Talking About Extrusion
If you have any questions or need further assistance, please visit our forum where you can find detailed discussions and expert advice on screw extrusion.