Project Overview
Material handling can become a serious problem when tackling large fabrication projects due to the size and weight of sheet and plate metal. While lifting magnets are cheap and strong, they cannot pick up a single sheet from a stack and struggle to generate sufficient magnetic force to securely hold onto thin sheets. Both of these limitations were dealbreakers as I have to stack my metal to get it home from the steel distributor, and I mostly cut sheets under 1/4" (<6.35 mm).
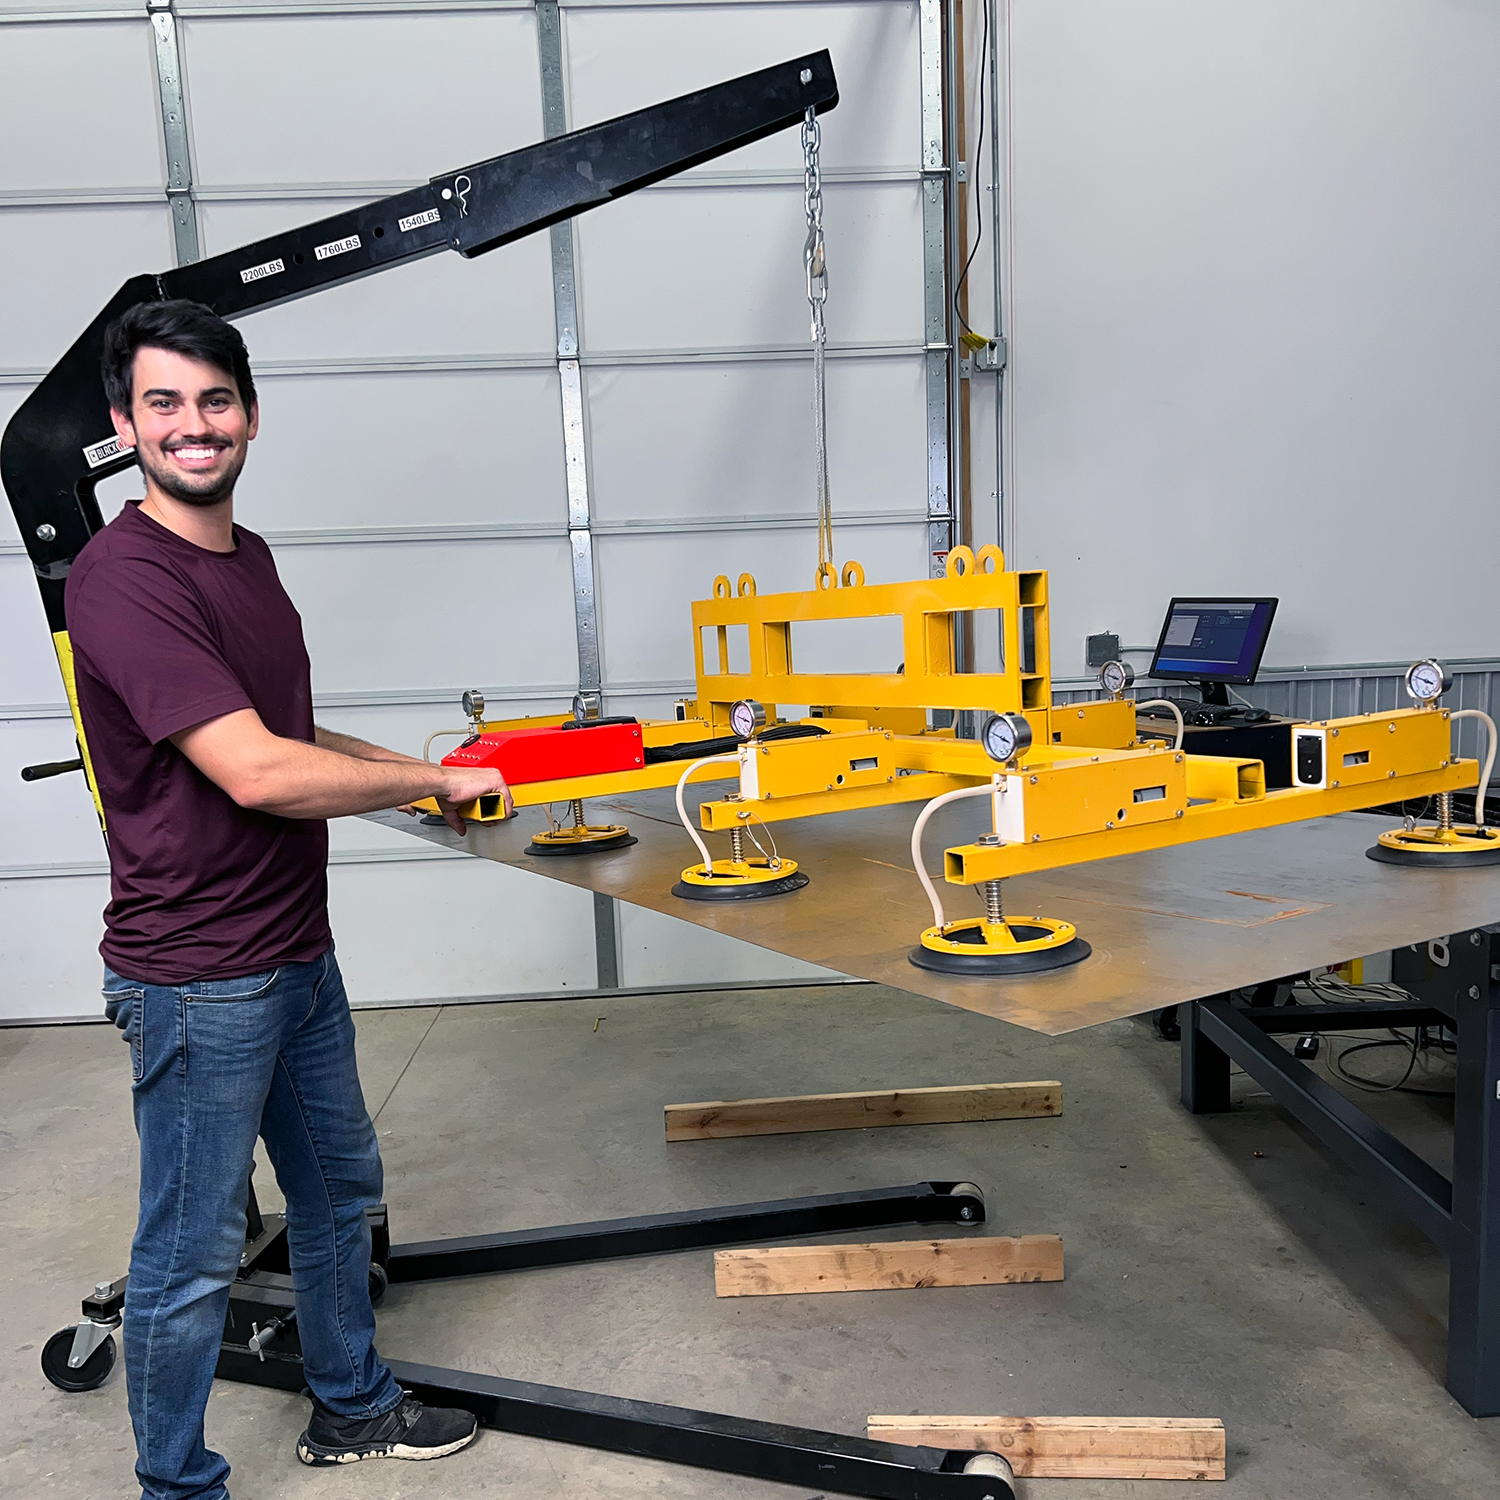
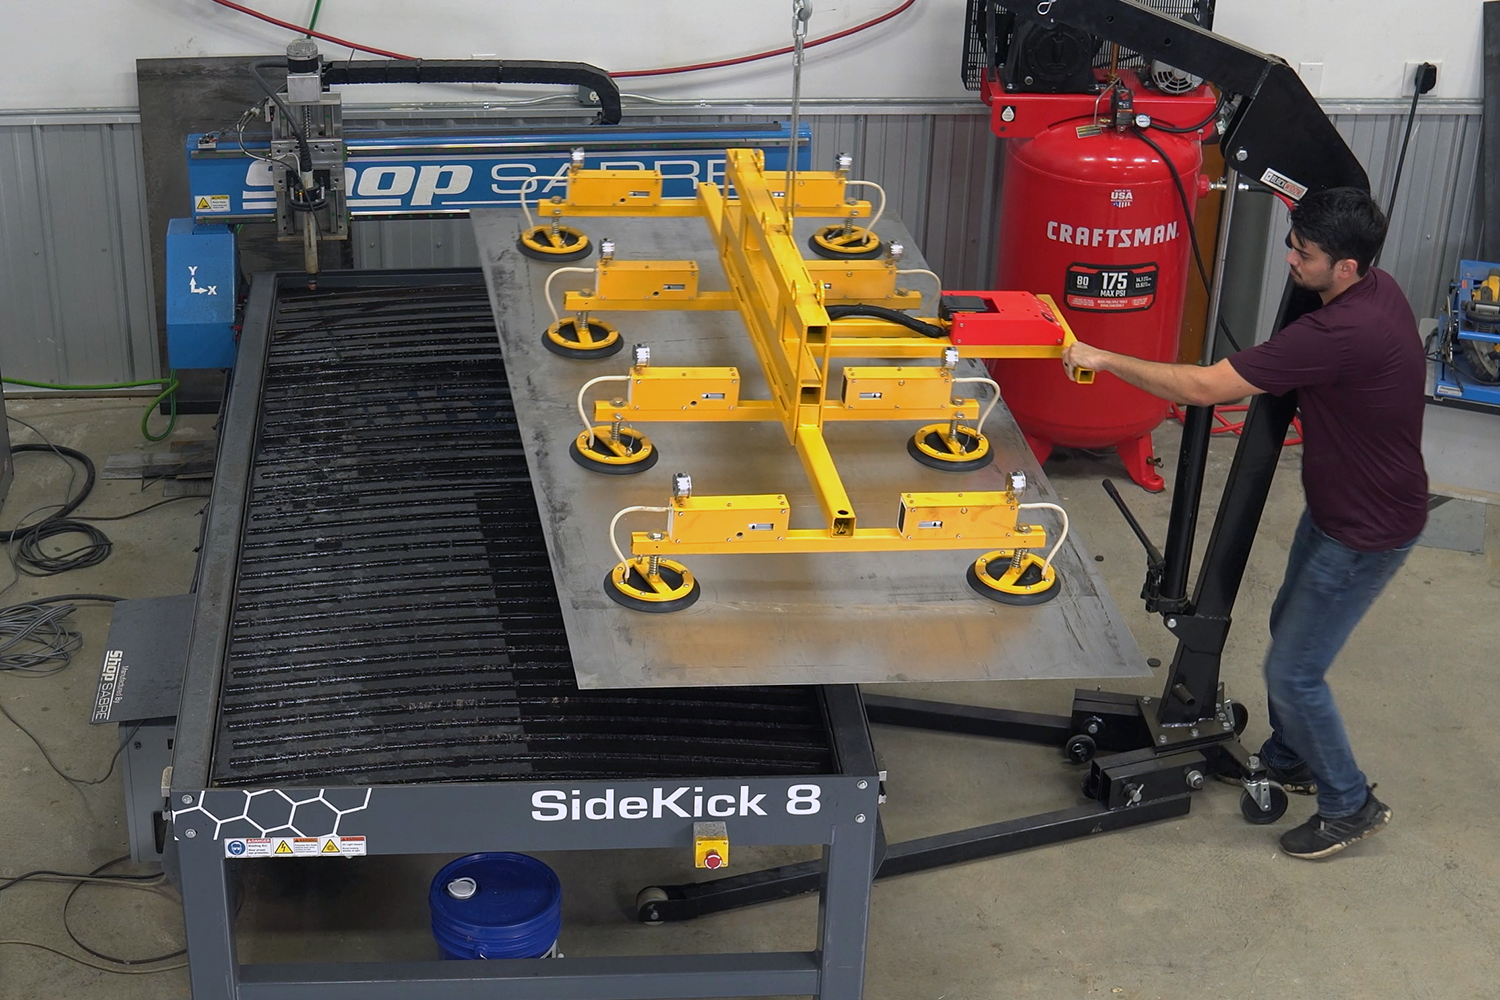
Vacuum lifters overcomes both issues as they use suction or vacuum to stick to only the top sheet in a stack and can grab ahold of thick or thin material as long as it is flat. Further, the holding power of an individual 8” suction cup is around 125 lbs, and vacuum lifters rely on an array of suction cups for greater lifting capacity and more stable handling of sheets with large surface areas.
Of course, the problem with vacuum lifters is their cost. Manufacturers only advertise the specifications of their vacuum lifters and not their price. And as the saying goes, if you have to ask, then you can’t afford it. Shopping around on the secondhand market, I was unable to find one for less than $5,000. While cost would suggest that this is complicated tool, I was underwhelmed by most commercial offerings as they all reprised the same basic design: a center support with off-shooting beams carrying one or two suctions cups. The only difference was how the vacuum was generated. Some designs used a venturi vacuum (powered by compressed air) and others used electric vacuum pumps.
The high price of vacuum lifters is likely a result of limited economies of scale and low inventory turnover, which drive up costs. If I am correct, these are the perfect projects to DIY as there can be some serious cost-savings if you have free time.
For questions, comments, and to share your build, please post to the forum.
SAFETY DISCLAIMER: Any device that lifts heavy sheets and plates of metal off the ground is dangerous, especially if it is DIYed! The holding force of the suctions cups depends on the quality of the surface that they are grabbing onto. Rough and dirty surfaces may lower the lifting capacity of the vacuum lifter or may not be able to be lifted at all. The vacuum lifter described in this article is battery powered. If the battery runs out, then the sheet could drop unexpectedly, causing bodily damage. Never stand underneath the vacuum lifter and check the voltmeter to be sure the battery has enough charge for a lift. Dr. D-Flo is not responsible for any damages, loses, or injuries because of any individual attempting this project. Experience with welding, electrical wiring, and overall, mechanical knowhow are musts.
License: This project is licensed under BY-NC-SA 4.0. Users are allowed to adapt and remix the work but all contributions must be distributed under the same license as the original (e.g., noncommerical). The base 3D model cannot be redistributed, but modifications that unlock new features or significantly improve the base function of the printer can be shared. For any questions on this license please contact Dr. D-Flo.
Features
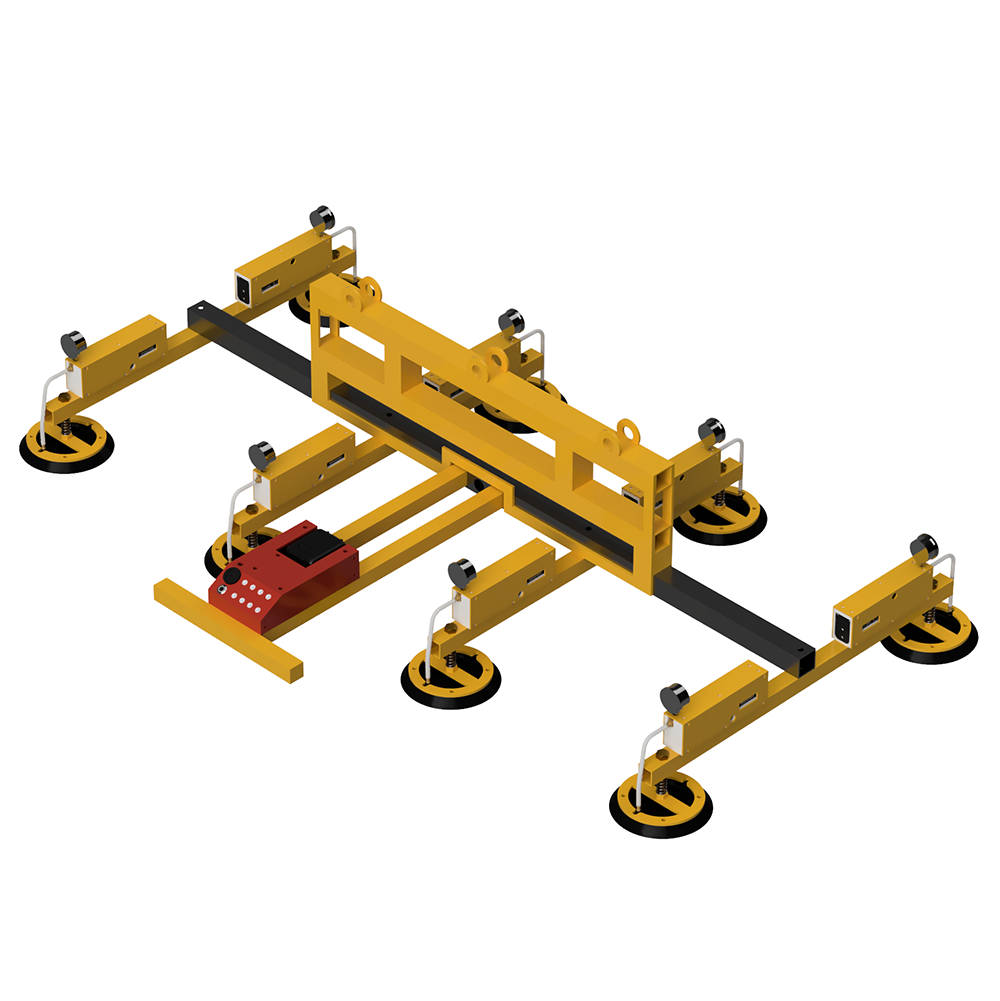
- Theoretical 1,000 lbs (450 kg) Lifting Capacity
- With each of the 8 suction cups rated for 125 lbs, this vacuum lifter can theoretically lift 1,000 lbs. While this value can only be achieved under perfect conditions, it does provide a 2.5x safety factor when lifting 1/4"x4’x8’ (6.35 mm x 1220 mm x 2440 mm) sheet.
- Battery Powered
- Powered by a standard 20V, 5Ah, DeWalt battery the 8 vacuum pumps can run continuously for 35 to 45 minutes before needing to be swapped out. Move the vacuum lifter around your shop without having to worry about power cords or air lines. No special equipment (e.g., air compressors) needed.
- Individually Controllable Suction Cups
- Each suction cup has its own vacuum pump, solenoid, and pressure gauge. This module design allows for each cup to be switched on or off for lifting entire sheets or smaller component out of the stock material after plasma cutting. Further, if one suction cups fails to seal, then the other cups will not be affected.
- Versatile Mobility Options
- The vacuum lifter can be lifted using an engine hoist or overhead gantry, thanks to the integrated lifting rings. Additionally, slots are provided to allow forklift use.
- Standard Off-the-Shelf Components
- This design uses components readily found on Amazon or McMaster-Carr. No expensive OEM parts. A suctions cup can be replaced for ~$30 if damaged.
BOM
Google Sheet BOMThe BOM may contain affiliate links that provide monetary kickbacks to Dr. D-Flo. These funds are used to pay for hosting this website and future projects.
3D Model
In addition to clicking the “Open in Fusion 360” on the model above, a STEP version of the assembly, DXF files for plasma cutting, and STL mesh models for 3D printing can be downloaded here.
Frame Assembly
The assembly of the model is straightforward:
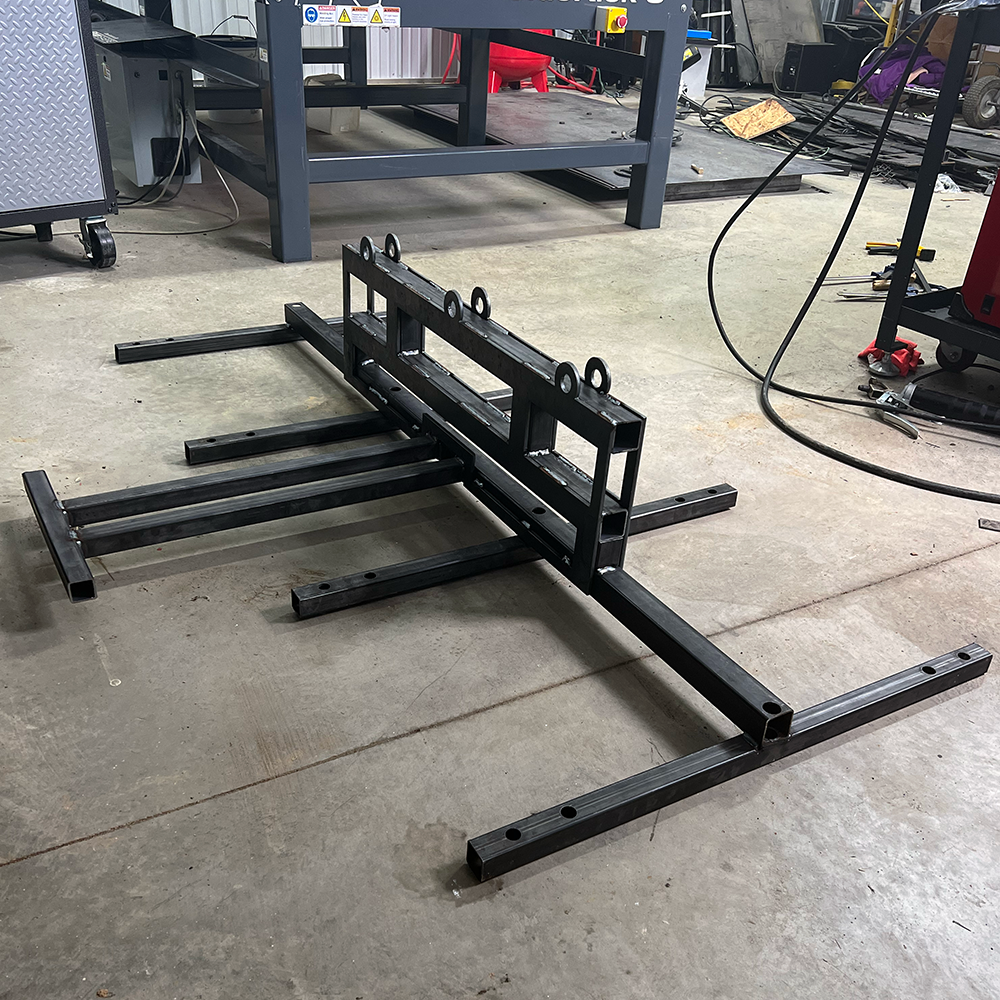
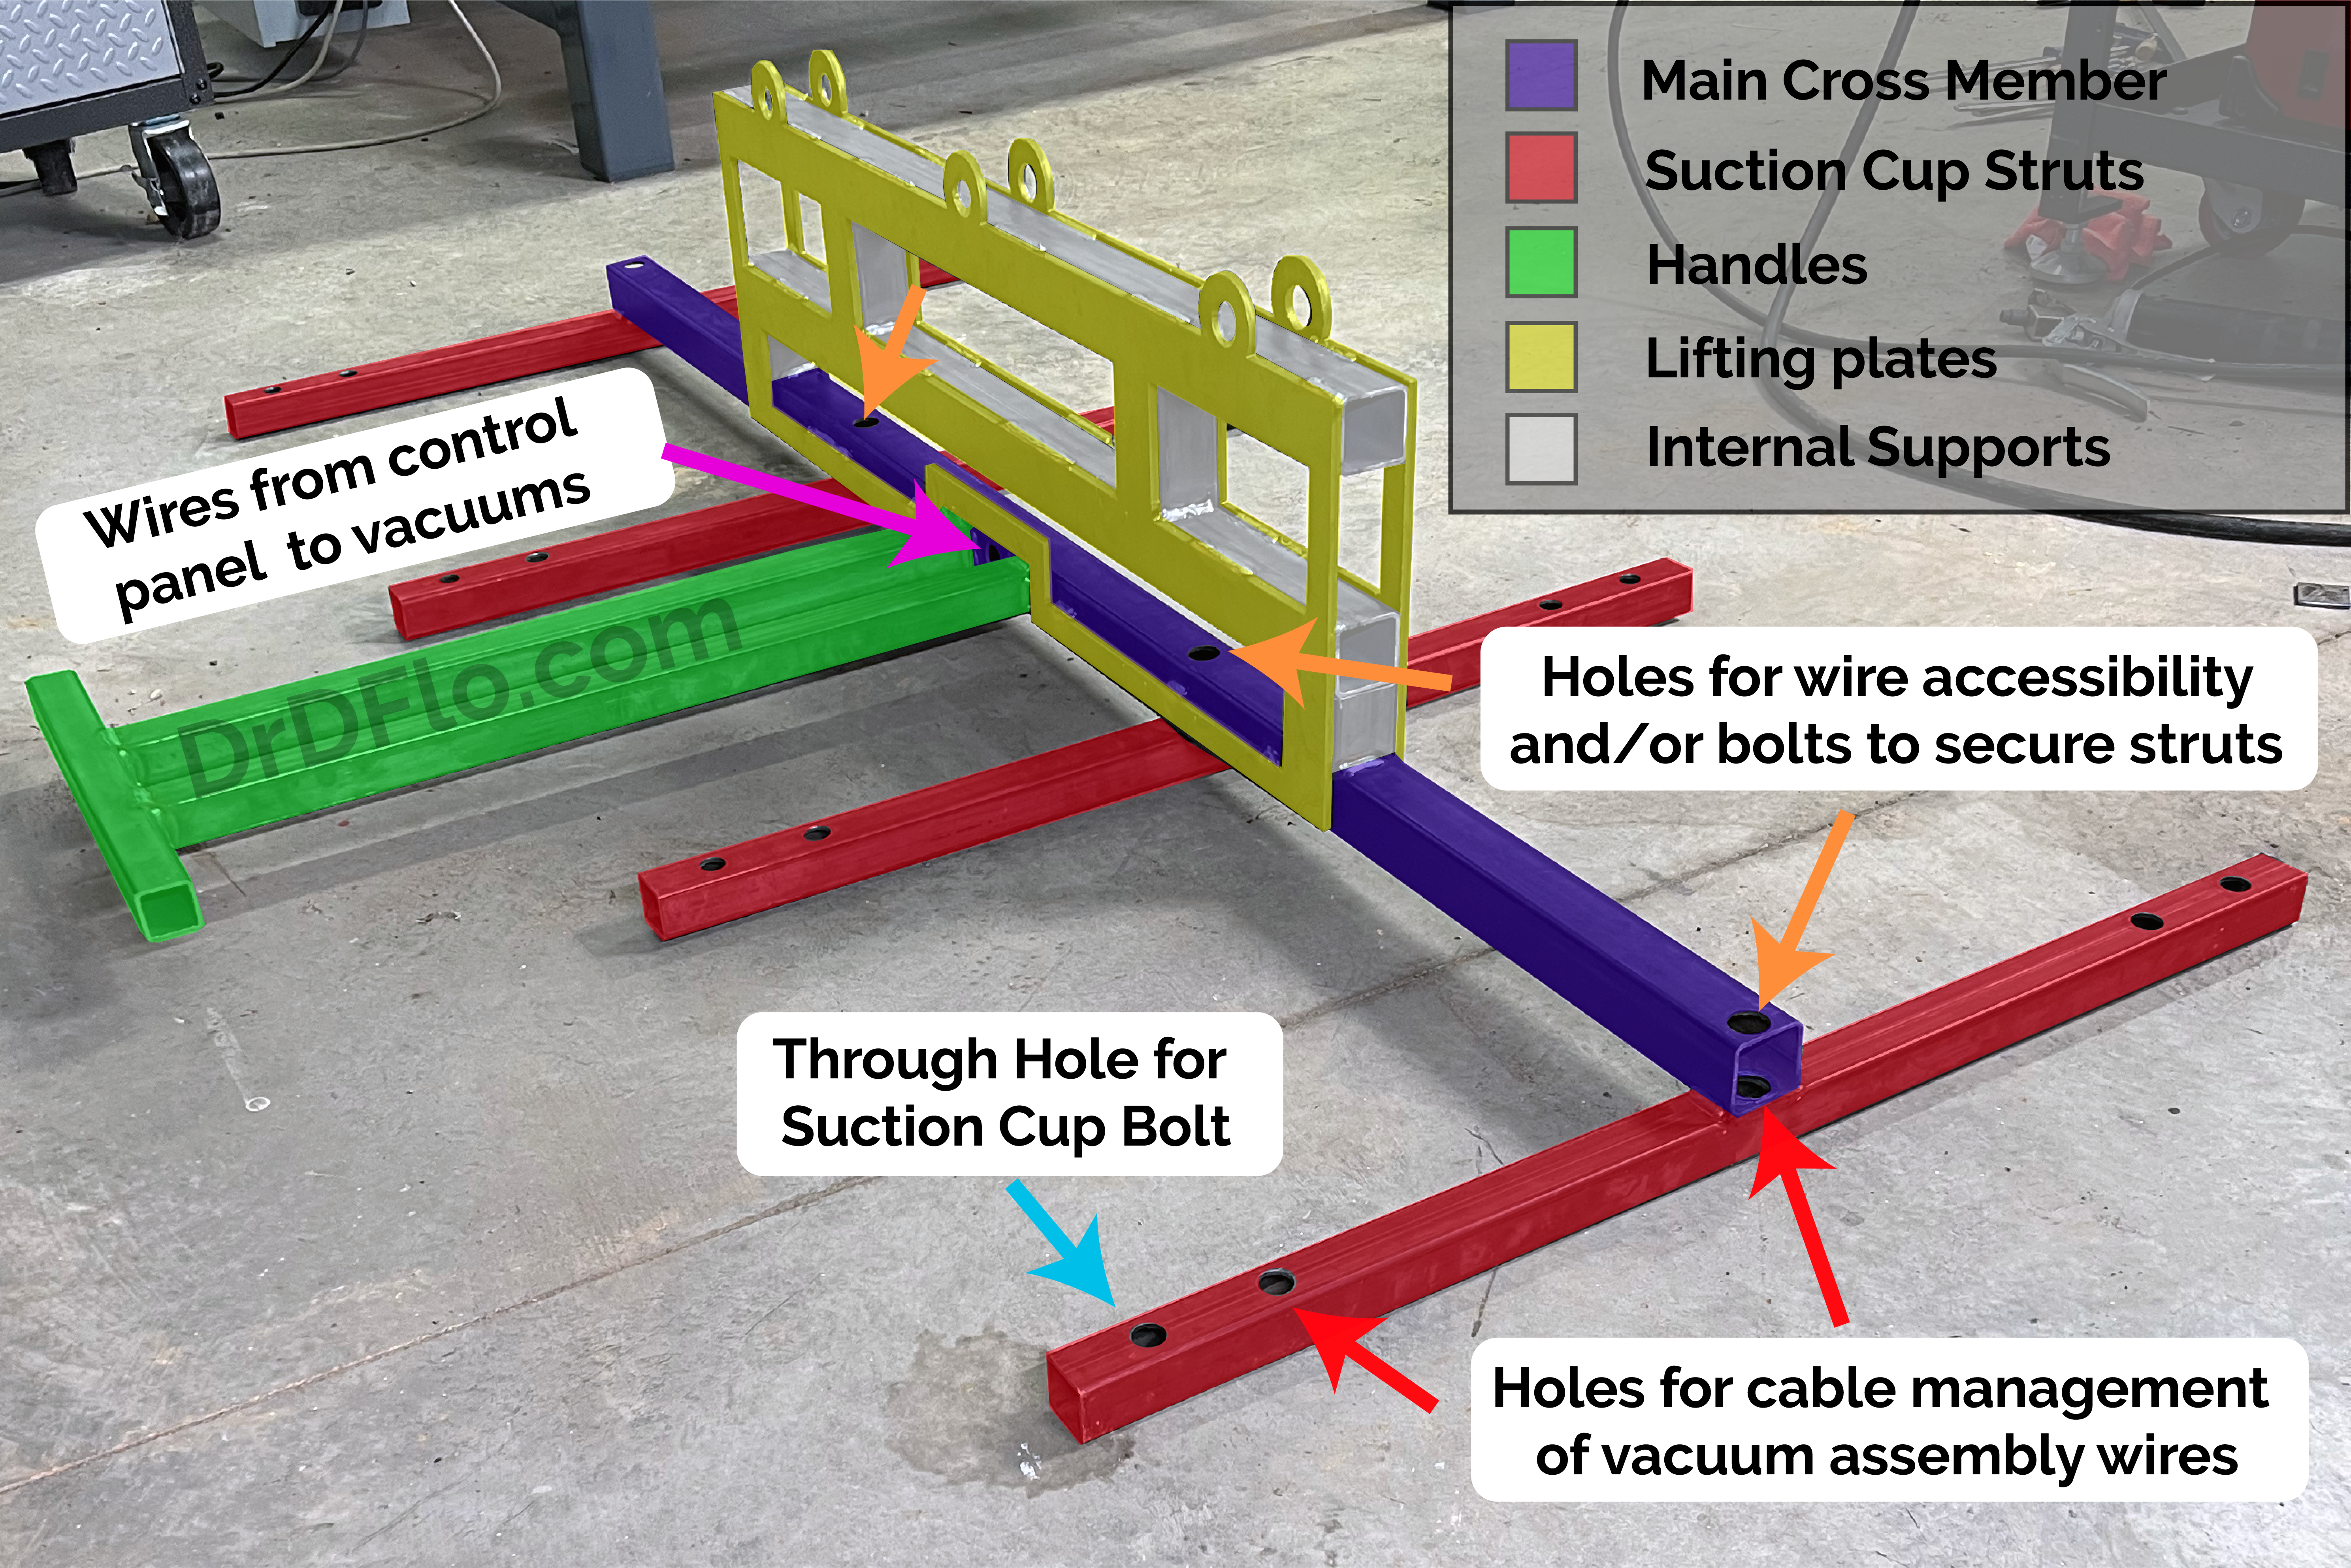
- Start by cutting the 11ga x 1.5” x 1.5” and 11ga x 2” x 2” square tubes down to size for the main cross member, side struts, handles, and supports for between the two lifting plates. The length and quantity of each tube stock is in the BOM or can be measured in the 3D model.
- Plasma cut or drill holes into the appropriate tubes for attaching the suction cups and managing the wires that will power the vacuum assembly (pictured above).
- Struts should be welded to the main cross members on any accessible edge. The current design has been exclusively used to lift 1/4” material and thinner. It is likely that the welds would hold up to thicker material, but brackets or bolts through the wire management holes (indicated on above picture) may be necessary to increase the assembly’s strength.
- Plasma cut both lifting plates. Weld one side of the lifting plates onto the main tube stock. Then assemble and sandwich the internal supports between the second lifting plate. Weld everything together.
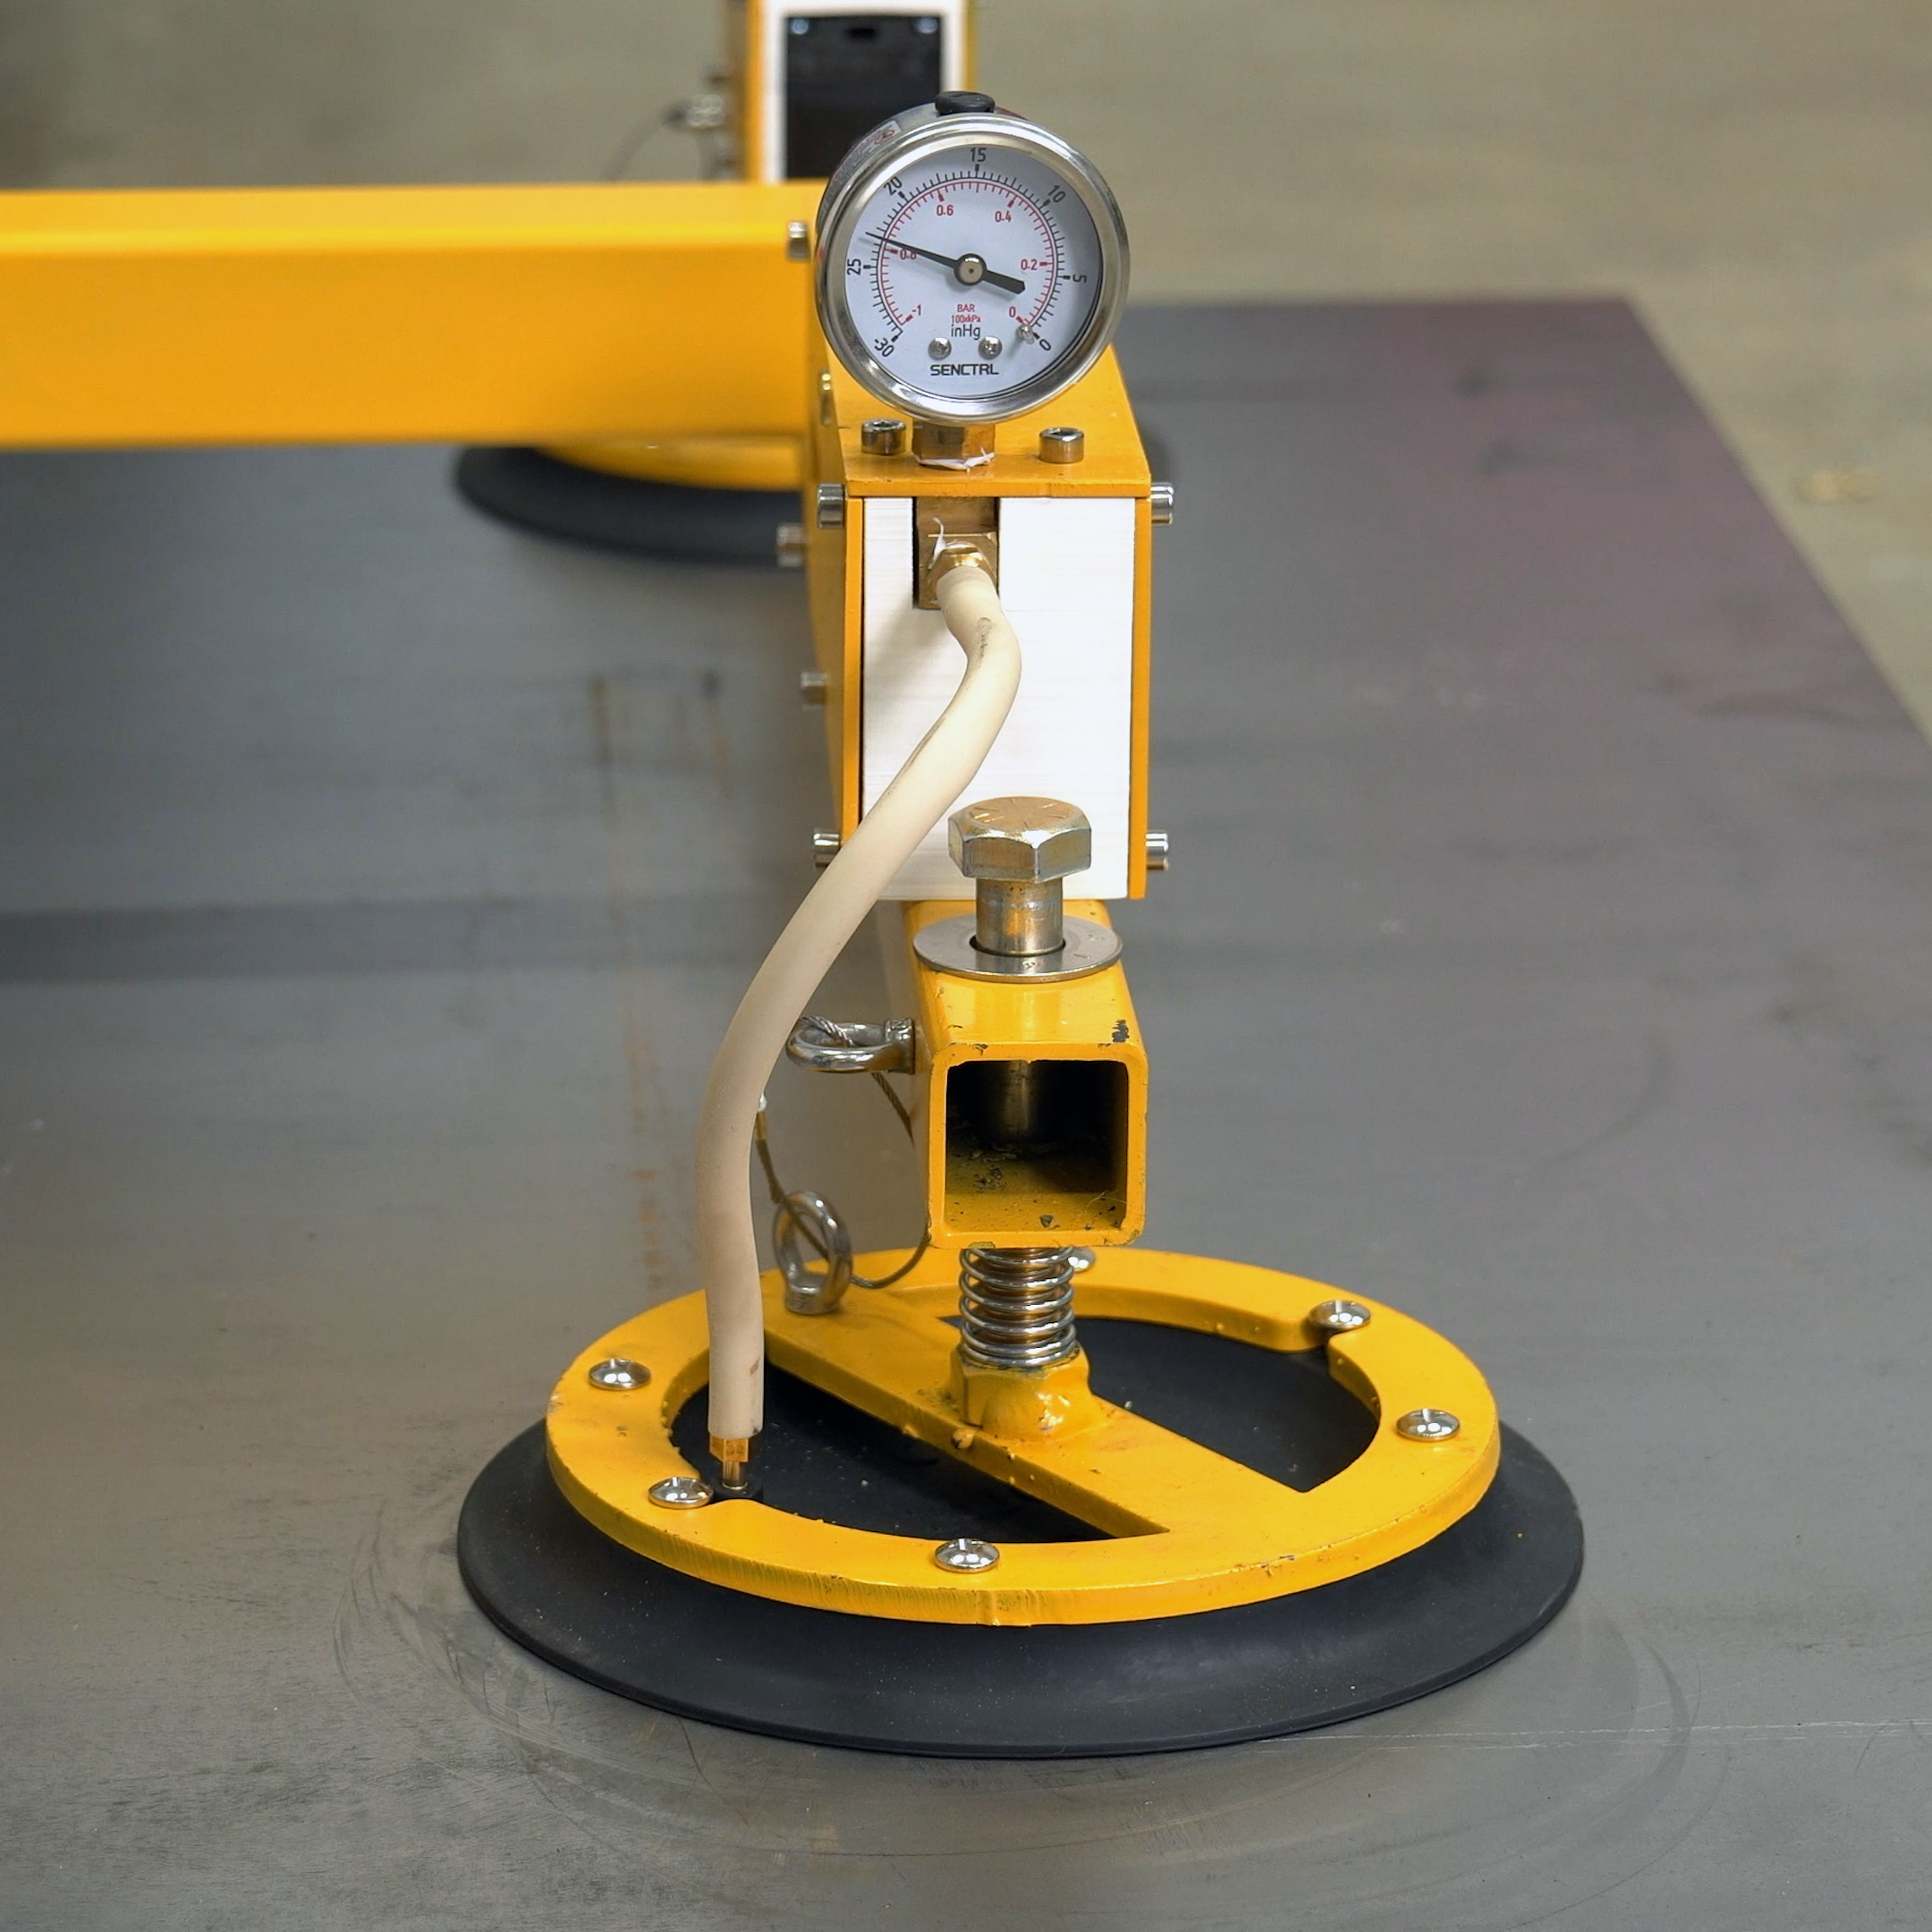
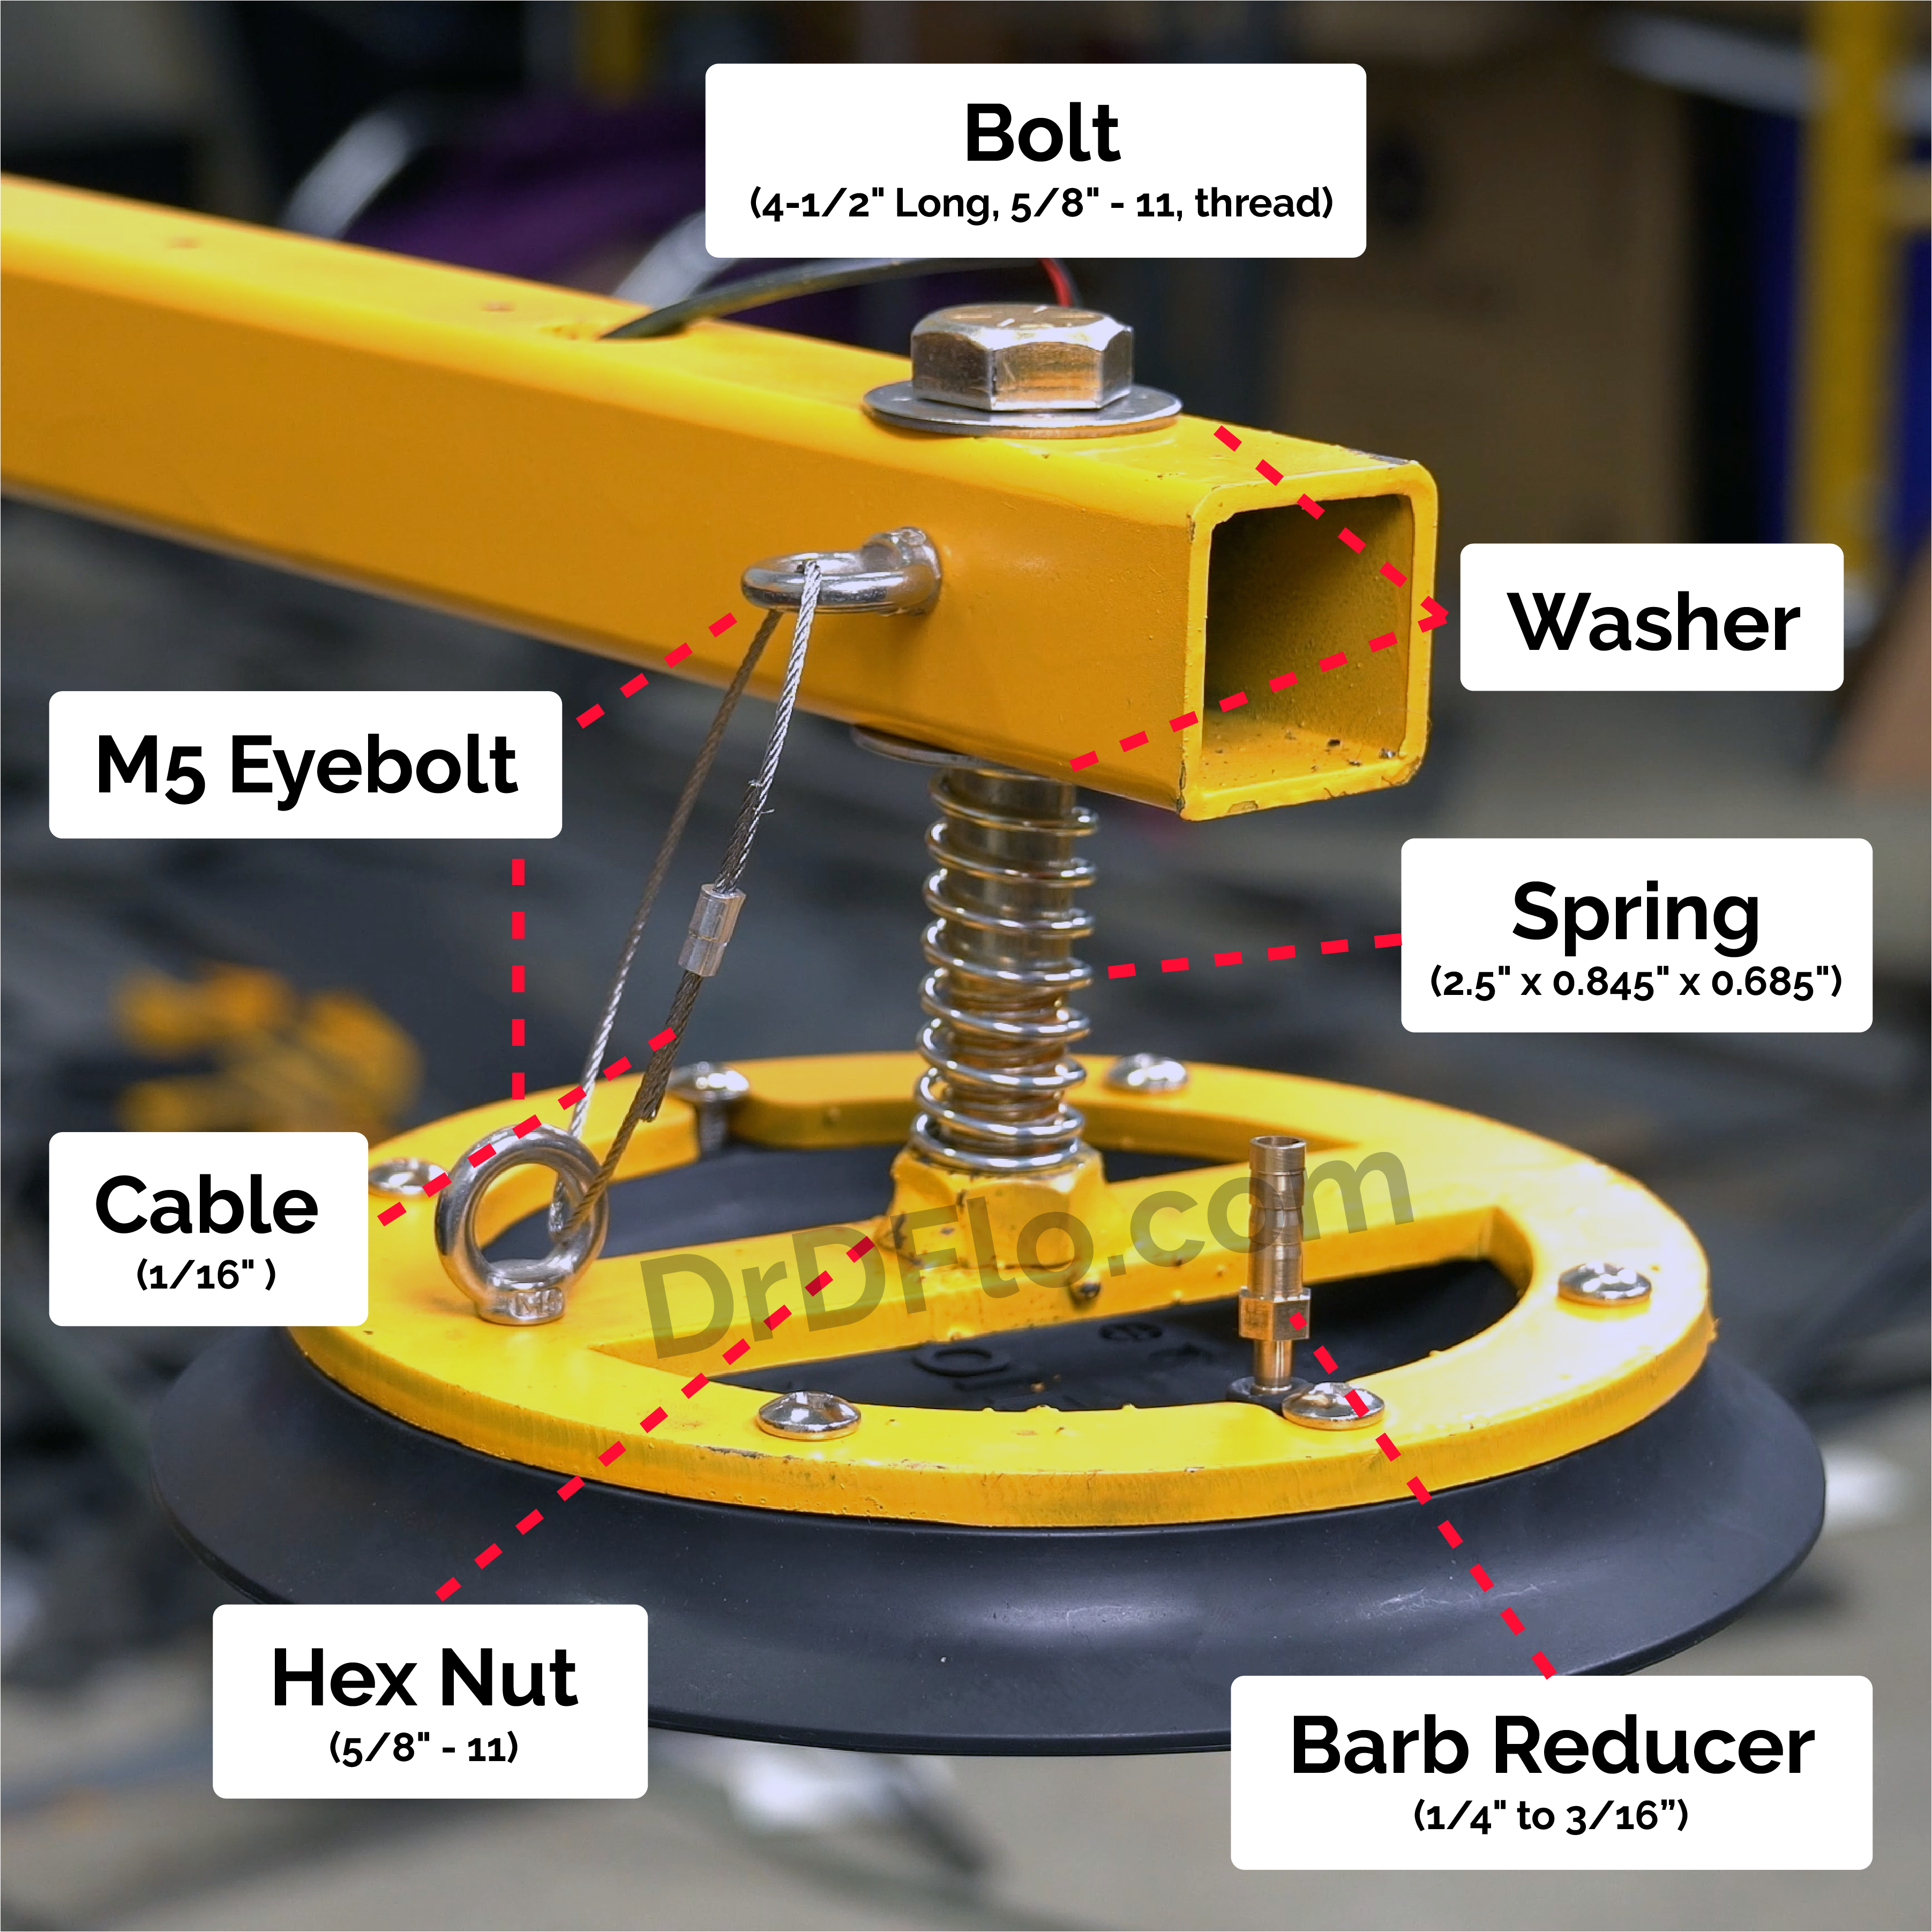
- Plasma cut the suction cup braces. Next, weld a 5/8"-11, threaded hex nut onto the center hole of the 8 suction cup braces.
- Disassemble the manual suction cups. Remove the handle and pump by unscrewing all 6 bolts. Save the bolts as these will be used to attach the braces. Some force may be required to remove the handle as the fitting between the pump and the suction cup relies on friction.
- Attach each suction cup and brace to the frame by adding a washer to a 5/8"-11, 4-1/2" long bolt, putting the bolt through the hole in the strut, adding another washer, then adding a 2.5" compression spring, and finally, screwing the bolt into the suction cup plate.
- Not modeled in the CAD assembly, but M5 eyebolts were added both to the end of the strut and the suction cup plate. A steel wire was looped between the two eyebolts to prevent the suction cups from spinning.
Vacuum Assembly
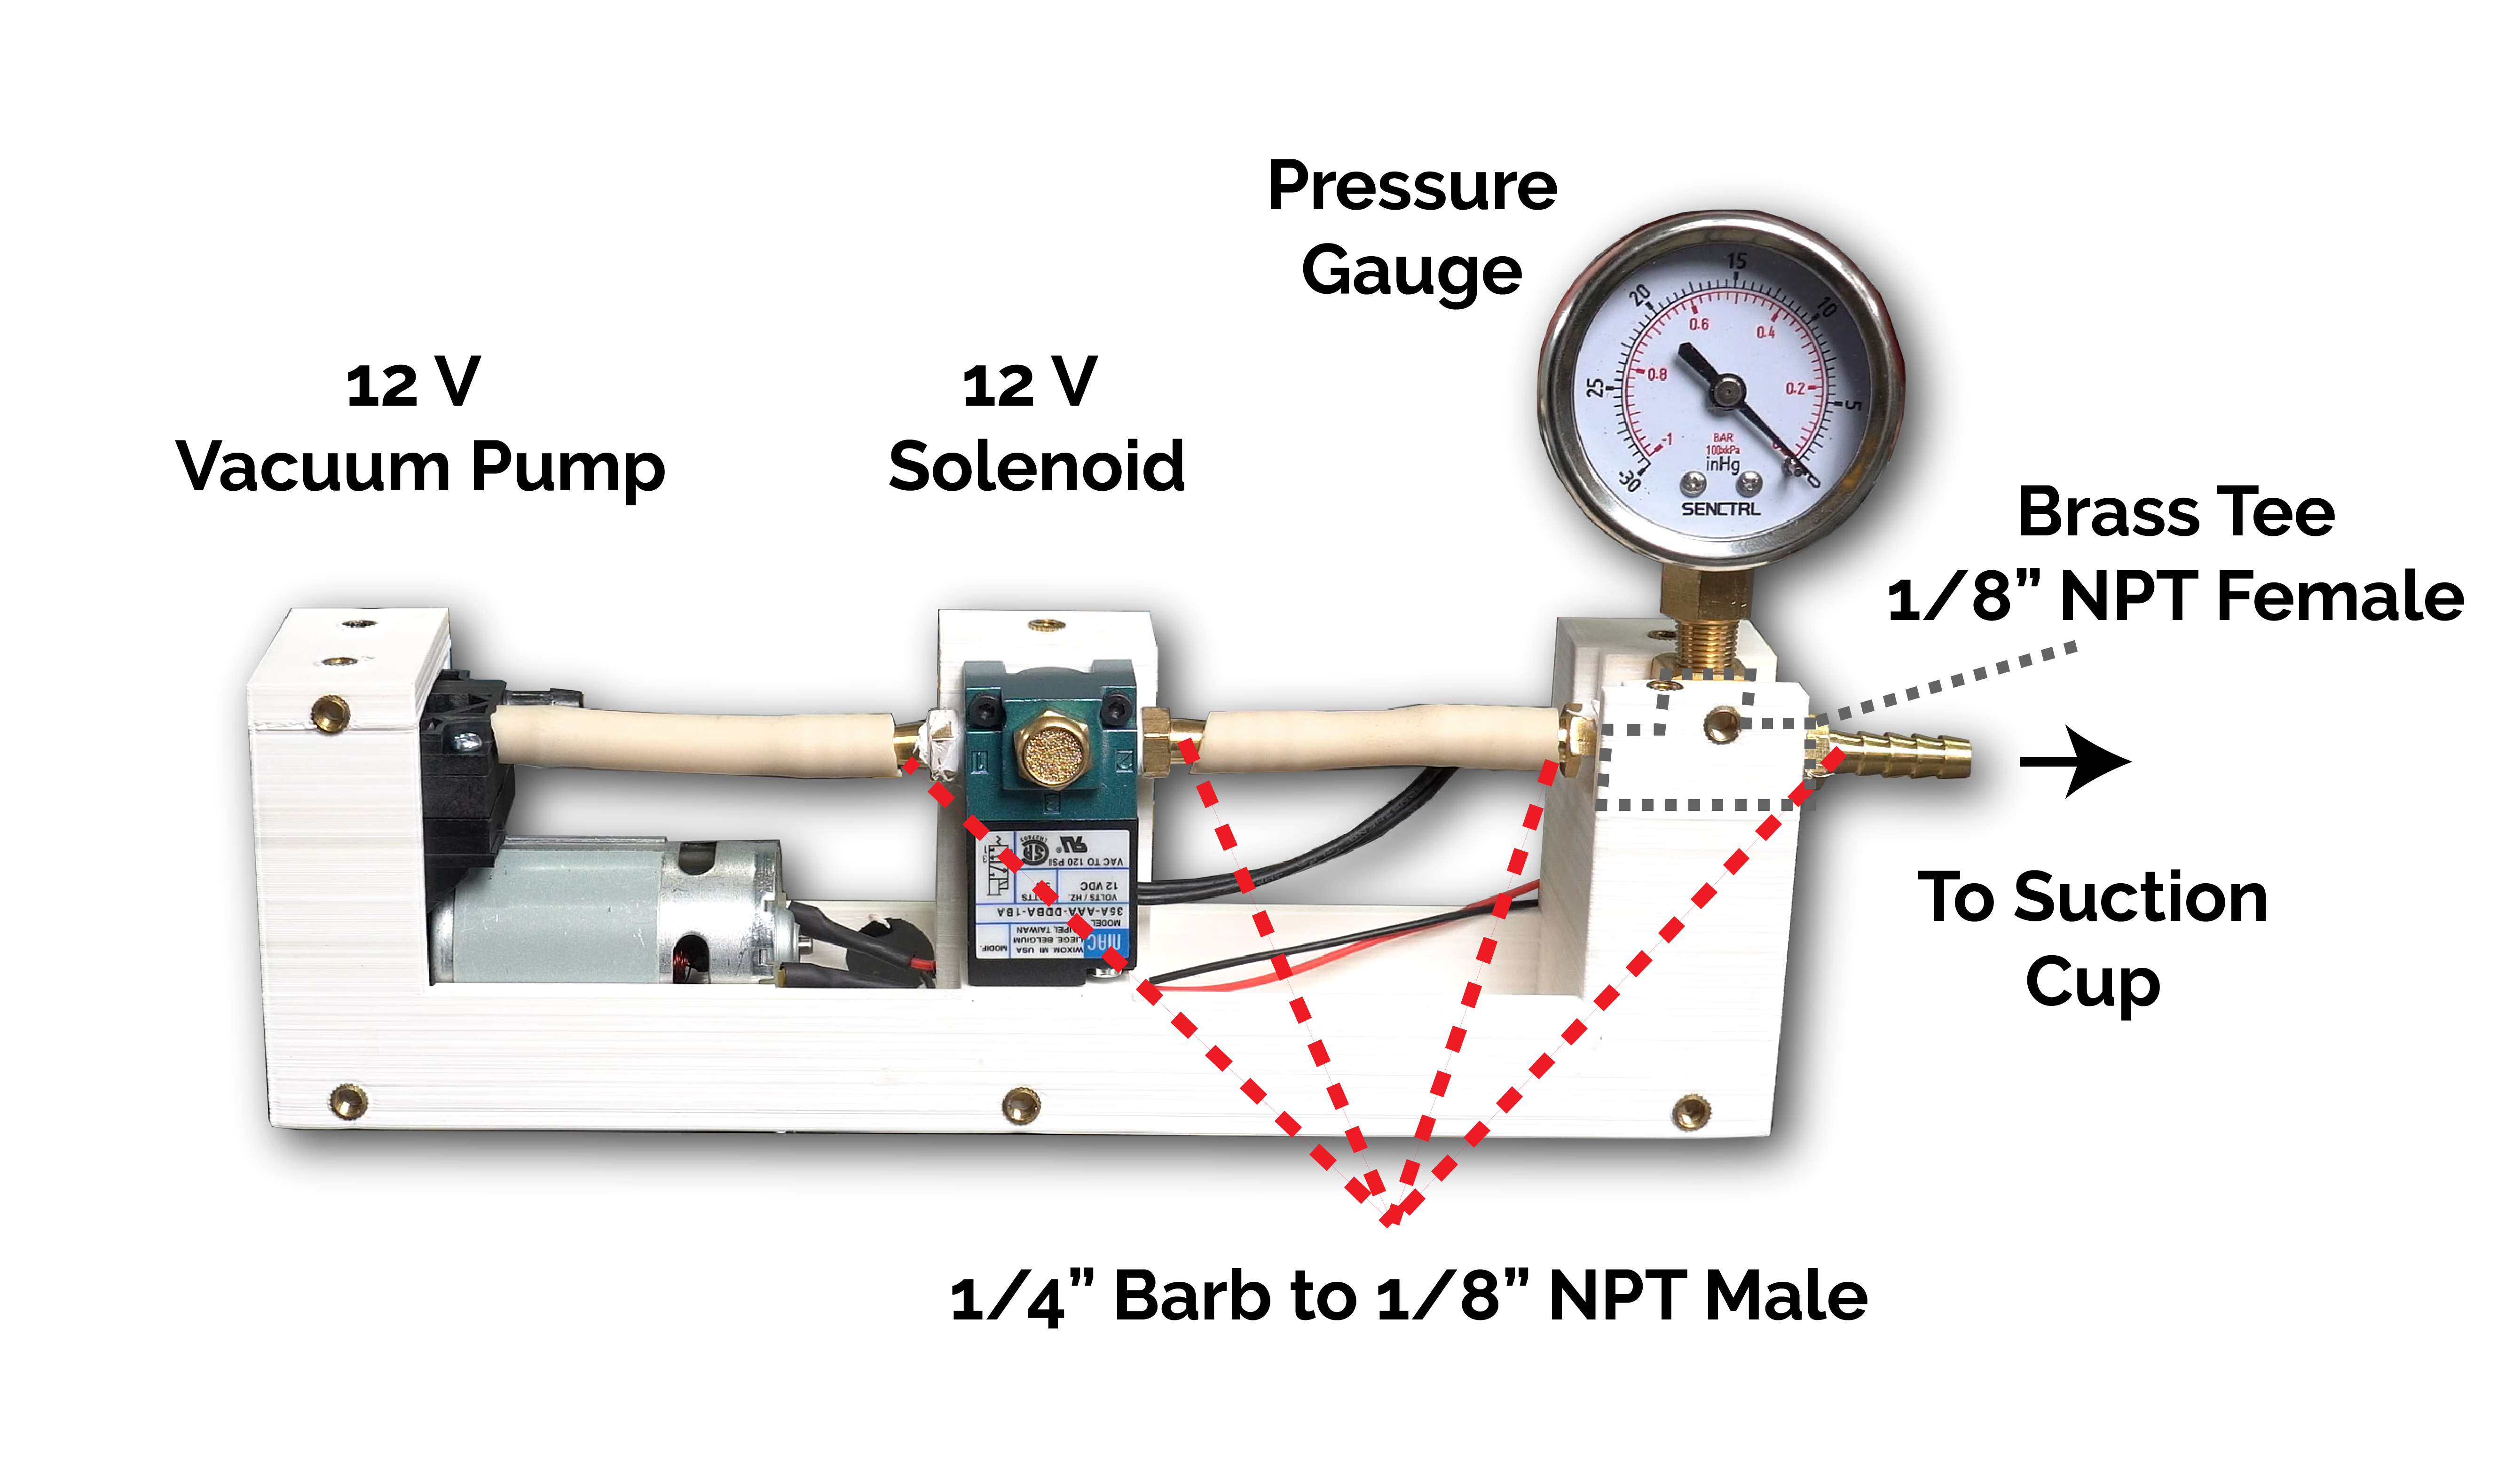
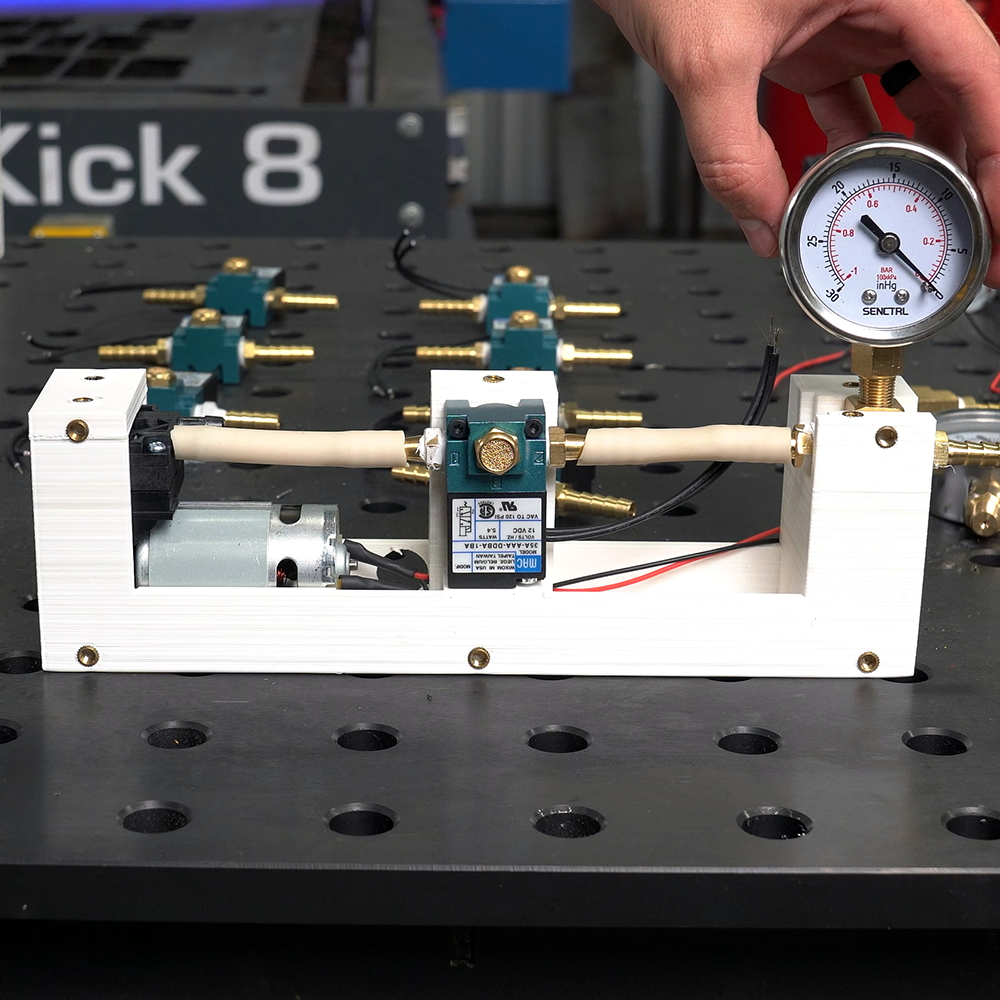
Several notes on the vacuum assembly:
- Hose clamps (not pictured) are recommended.
- The pressure gauge is attached after the metal top has been placed on the 3D printed holder. This will also keep the brass Tee in place.
- The motor is held in place by a slip fit. Some double sided tape may be useful especially if hose clamps are not used.
- M3 heatset inserts are used to bolt the solenoid into place and M5 heatset inserts are used on the outside to attach the exterior metal panels.
Wiring
Disclaimer: Electricity is dangerous both to yourself and your property. Improper technique can lead to electrocution and/or fire. Always disconnect the battery and check with a multimeter to ensure a circuit is de-energized prior to begining work. The wiring diagrams and information provided are for reference only. Dr. D-Flo assumes no responsibility for your property or health if you take on this DIY project.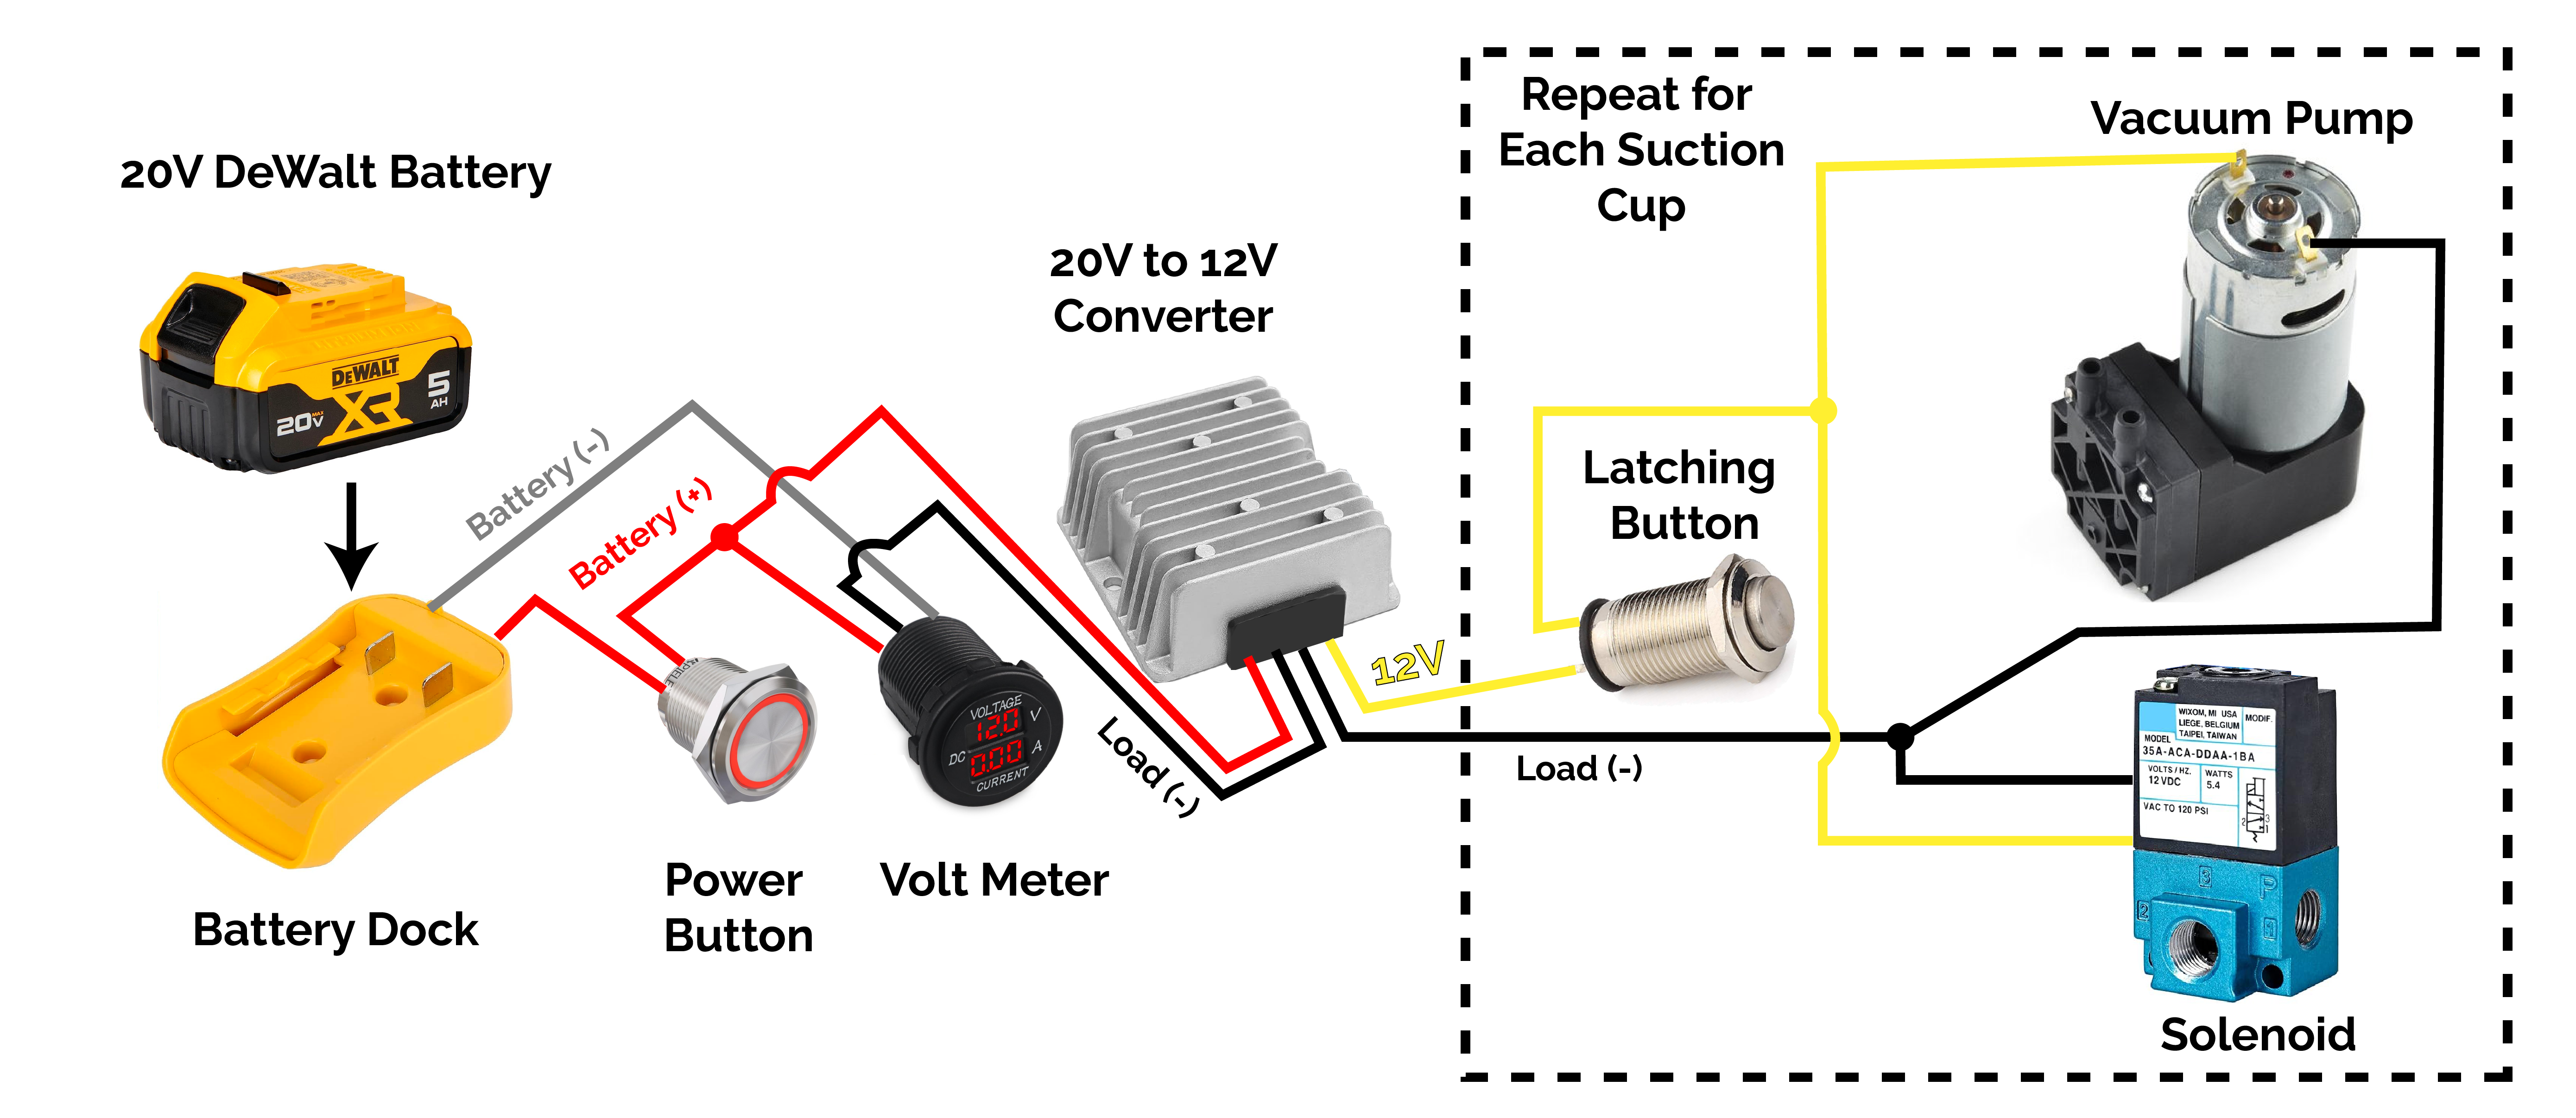
Purchase a Kit!
If you are interested in building your own vacuum lifter, then expediate the process by purchasing a kit from Dr. D-Flo. This kit includes:
- All required tube stock cut to length with necessary holes.
- Plasma cut suction cup braces and lifting plates.
- Mounting hardware for spring loaded suctions cups and all fasteners needed.
- All vacuum components, including pumps, solenoids, gauges, and tubing.
- Electrical components: wire harness, buttons, voltmeter, and 20V-to-12V converter. (DeWalt battery not supplied)
You will be responsible for welding and assembly. Purchasing the kit comes with direct, email technical help from Dr. D-Flo.
Kit Price: $2500
Email Dr. D-Flo ([email protected]) to place an order.
Open-Source Content
Dr. D-Flo’s #1 priority is ensuring uninterrupted access to his digital fabrication content for everyone. Information and project files are free without any intrusive advertisements. The goal of this website and YouTube channel is to inspire more makers, DIYers, machinists, fabricators, and engineers as we need physical solutions for many of the problems facing our society.
If you find yourself in a position to contribute, we would greatly appreciate your support through becoming a YouTube channel member, a one-time donation, or purchasing your tools through Dr. D-Flo’s Amazon store.
Discussion and Feedback
Do you need more help? The best way to get your questions answered by Dr. D-Flo and other DIYers is to post a question on the forum. Click here for the forum topic specific to this project.
Rate this Project: or
Did you encounter broken links or misinformation while reading this article? Please bring these issues to our attention by providing your feedback below. This forum and email should not used for technical help. All help requests should be posted on the forum.